

Customize your survey email templates
How to enable email templates in CultureMonkey, customize the invitation and reminder emails employees receive, use merge fields to personalize them, preview and test your work, and choose the right template when you launch a survey.
On this page
- What email templates are
- Enabling email templates
- Anatomy of a template: invitation vs reminder
- Customizing subject, body, and branding
- Merge fields and personalization
- Creating, editing, and previewing a template
- Choosing a template when you launch a survey
- Best practices for invitation copy that lifts responses
- Frequently asked questions
- Where to go next
The email your people receive when a survey goes out is the very first impression of that survey - and it does a surprising amount of work. A warm, on-brand invitation in your own voice earns more responses than a generic system message ever will. Email templates in CultureMonkey let you take control of exactly what that email says, who it appears to come from, and how it looks.
This guide walks you through enabling email templates, customizing the survey invitation and reminder emails, personalizing them with merge fields, previewing and testing your changes, and picking the right template when you launch a survey - plus practical advice for writing invitation copy that actually lifts your response rate.
Email templates are reusable, editable versions of the emails CultureMonkey sends employees. Once the feature is enabled for your account, an Account Admin can edit the subject, body, sender name, and branding of the invitation and reminder emails, drop in merge fields like {{employee_name}} to personalize them, preview and send test emails, and then attach a specific template to any survey you launch.
What email templates are
An email template is a saved, reusable email - a subject line, a body, a sender identity, and some branding - that CultureMonkey uses when it emails your employees. Instead of sending a fixed, one-size-fits-all message, the platform sends your message, filled in automatically with the right details for each survey and each recipient.
Templates cover several moments in the survey lifecycle, but the two you'll customize most are:
- The invitation (launch) email - the message that goes out when a survey first opens, inviting employees to participate.
- The reminder email - the nudge that follows up with people who haven't responded yet.
Each account starts with a set of default templates maintained by CultureMonkey (things like "Email 2: Survey Release" and "Email 3: Survey Reminder 1"). You can use these as-is, duplicate the intent in your own words, or create brand-new custom templates from scratch. Default templates are labeled separately from the custom ones you build, so it's always clear which is which.
A template isn't tied to a single survey. Build a great invitation once, and you can attach it to every engagement survey, pulse, or lifecycle survey you run. Update the template, and every future send picks up the change.
Enabling email templates
Email template customization is controlled by an account-level setting, Enable email templates. Until it's switched on, surveys send using CultureMonkey's standard notifications and you won't see the template picker in survey settings.
- 1Confirm the feature is on - email templates are governed by an account-level setting. If you don't see an Email Templates page under General in the left navigation, the feature isn't enabled yet.
- 2Turn it on - an Account Admin (or your CultureMonkey contact) enables the setting for the account.
- 3Open the Email Templates page - once enabled, go to General → Email Templates to see your template library.
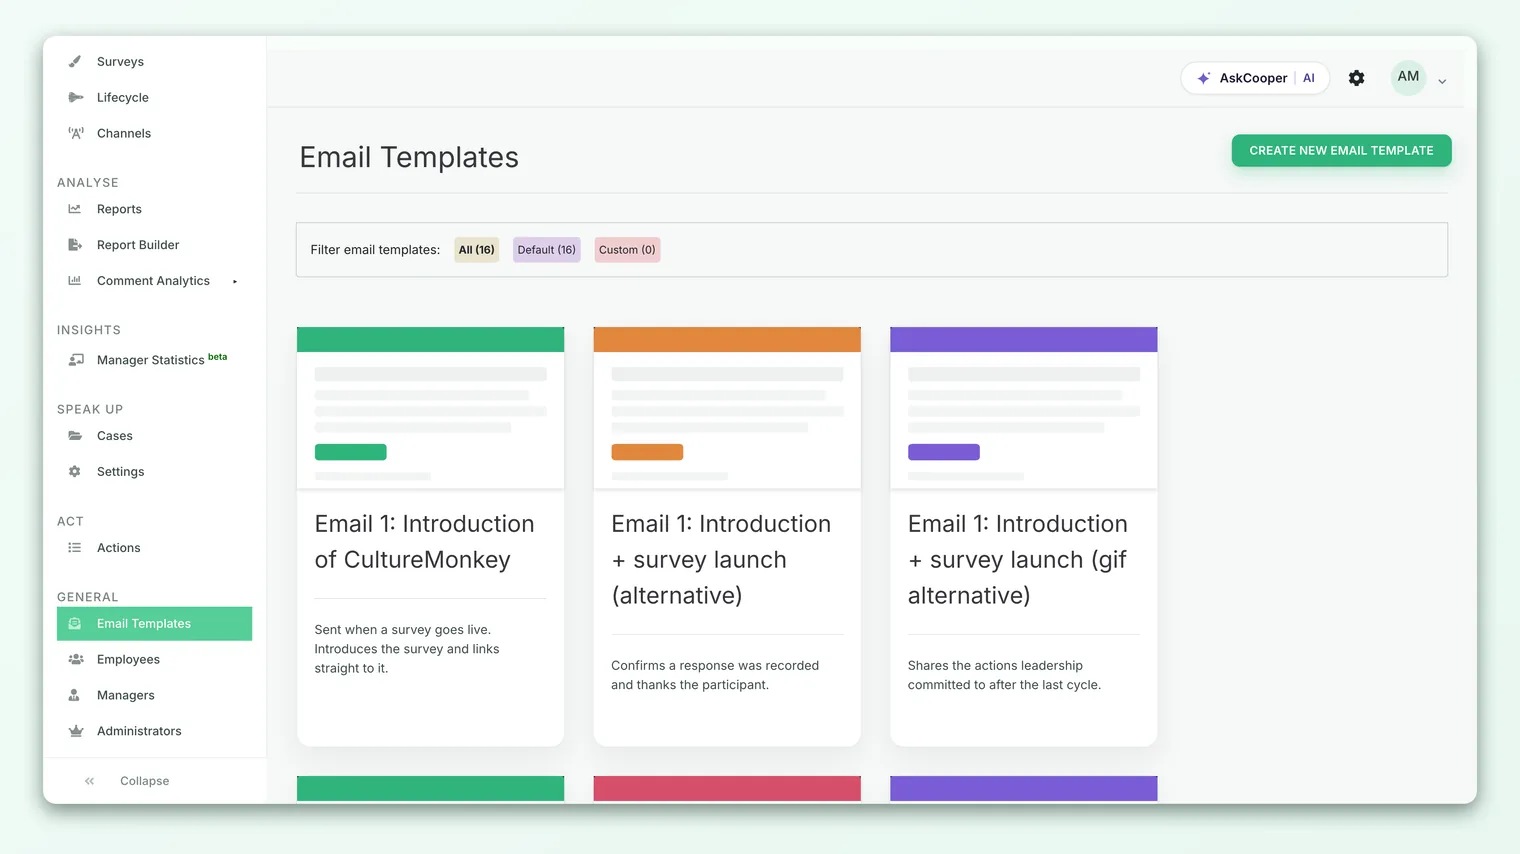
Once you're on the page, you'll see your templates displayed as cards, each with a thumbnail, a name, and a short description. Filter tabs at the top - All, Default, and Custom - let you narrow the list, and each tab shows a count so you can see at a glance how many templates of each kind you have.
Anatomy of a template: invitation vs reminder
The invitation and reminder emails are built from the same set of editable fields - what changes is the intent of the copy, not the mechanics. Here's what each one is for:
| Invitation (launch) email | Reminder email | |
|---|---|---|
| When it sends | When the survey first opens | To people who haven't responded yet |
| Its job | Explain the survey, build trust, invite participation | Give a gentle, friendly nudge |
| Attached to a survey via | The Launch Template field | The Reminder Template field |
| Typical tone | Welcoming, context-setting, reassuring on anonymity | Short, warm, low-pressure |
Both are edited on the same form and use the same merge fields, so once you're comfortable customizing one, the other works exactly the same way.
Customizing subject, body, and branding
When you create or edit a template, you're working with a single form. These are the fields you can control:
| Field | What it does |
|---|---|
| Name | An internal label for the template (e.g. "Q3 Engagement - Invitation"). Employees never see this; it's how you identify the template in your library and in the survey picker. |
| Subject | The email subject line. Supports merge fields. |
| Body | The full email content, edited in a rich-text (WYSIWYG) editor so you can format text, add links, and structure the message. Supports merge fields. |
| Sender name | The display name recipients see in the "From" line. |
| From email | The sender address prefix (your account's sending domain is added automatically). |
| Thumbnail image | An optional image URL shown on the template card in your library. |
| Display description | An optional short description shown on the template card, to help you and your team remember what the template is for. |
Together, the sender name and from email control how the message appears in an employee's inbox - for example, "People Team <surveys@yourcompany>". A recognizable sender is one of the simplest ways to boost trust and open rates. The body editor is a full rich-text editor, so you can add your logo, links, and formatting to keep the email on-brand.
Name, subject, body, and from email are required; the from-email value can't contain spaces. Everything else is optional.
Merge fields and personalization
Merge fields (also called placeholders) are tokens you type into the subject or body that CultureMonkey swaps for real values when the email is sent - so a single template can greet every recipient by name and link each person to the right survey. They're written with double curly braces, like {{employee_name}}.
These are the placeholders available for invitation and reminder emails:
| Merge field | Replaced with |
|---|---|
{{account_name}} | Your organization's name |
{{employee_name}} | The recipient employee's name |
{{survey_title}} | The participant-facing survey name |
{{survey_ends_on}} | The survey's end date, formatted |
{{survey_response_url}} | The recipient's link to take the survey |
{{survey_identity}} | The anonymity/identity disclaimer text |
There are additional placeholder sets for other kinds of emails - for example, manager reminder emails support fields like {{manager_name}}, {{participation_rate}}, {{total_reportees}}, {{total_submissions}}, and {{silent_participants_table}}. The full list of available placeholders is shown right on the template edit form, so you never have to remember them.
Your invitation and reminder emails must contain {{survey_response_url}} - that's the personalized link each employee uses to open their survey. Leave it out and recipients will have no way to respond. Type merge fields exactly as shown, including the double braces; a typo like {{employee_name }} won't be recognized.
Creating, editing, and previewing a template
- 1Start a new template - on the Email Templates page, click Create New Email Template. To adapt an existing one, open a template and choose Edit Template instead.
- 2Fill in the basics - give the template a Name, set the Sender name and From email, write your Subject, and compose the Body in the editor. Insert merge fields wherever you want personalized values.
- 3Save it - save the template to add it to your library. If multilingual email templates are enabled for your account, you'll be able to add translations on a separate tab after saving.
- 4Preview it - open the template to see it rendered exactly as an employee would, with all merge fields filled in from sample data. If you use multiple languages, you can switch the preview language from a dropdown.
- 5Send a test - from the preview, use Send Test Email to deliver a live copy to any address you choose (and, if applicable, in a specific language). Check it in a real inbox on desktop and mobile before you rely on it.
Previewing and testing are the steps people are tempted to skip - don't. Merge fields, formatting, and how your logo renders in an actual email client are exactly the things that look fine in the editor and break in the inbox. A single test send catches almost all of them.
The preview and test email fill merge fields with representative sample values, not a real employee's details. That's expected - it lets you confirm the layout and wording without sending anything to your people. Real values are inserted when the survey actually goes out.
Choosing a template when you launch a survey
Once your templates exist, you attach them to a survey in its email notification settings. Each survey has two separate slots:
- Launch Template - used for the survey launch (invitation) email. "This template will be used for the survey launch e-mail."
- Reminder Template - used for all email reminders. "This template will be used for all e-mail reminders."
- 1Open your survey's email settings - in the survey's notification configuration, find the Launch Template and Reminder Template dropdowns.
- 2Pick a template for each - choose one of your templates from each dropdown. Leaving a slot on CultureMonkey Default uses the standard built-in message for that email.
- 3Send a test from here too - each dropdown has a Send a test Email link so you can verify the exact template attached to this survey.
- 4Save your settings - save to attach the templates to the survey.
Once a survey is running or has ended, the Launch Template is locked - the invitation has already gone out, so there's nothing to change. The Reminder Template can still be updated while a survey is running (until it ends), since reminders are still to come. Set your launch template before you start the survey.
Best practices for invitation copy that lifts responses
The template mechanics are the easy part; the words are what move your response rate. A few principles that consistently work:
- Lead with the "why." Open with what the survey is for and how the feedback will be used - not "please complete this survey." People respond when they believe it matters.
- Make the sender human. A recognizable sender name - your People team, or a named leader - beats a faceless system address. Familiarity earns opens.
- Reassure on anonymity, clearly. Include
{{survey_identity}}or your own honest statement about confidentiality. Trust is the single biggest driver of candid participation. - Keep it short and scannable. One clear ask, one obvious button or link (
{{survey_response_url}}), and a visible deadline ({{survey_ends_on}}). Long emails lose people. - Personalize genuinely. A
{{employee_name}}greeting helps, but the real personalization is relevance - reference the specific survey and why this team's voice matters. - Set expectations. Tell people roughly how long it takes and when they'll hear back about results. "You spoke, we acted" starts with "here's what happens next."
- Warm up your reminders. Reminder copy should be shorter and lighter than the invitation - a friendly nudge, never a scolding. Assume good intent; most non-responders simply got busy.
A large share of employees open survey invitations on their phones. Send yourself a test and check that the subject isn't cut off, the link is easy to tap, and your logo loads on mobile - not just on desktop.
Frequently asked questions
What's the difference between a default template and a custom template?
Default templates are the ready-made emails CultureMonkey provides (like "Email 2: Survey Release" and "Email 3: Survey Reminder 1"). Custom templates are the ones you create or edit yourself. Both appear in your library, and the Default and Custom filter tabs let you view each set separately.
Do I have to create a template, or can I just use the defaults?
You can use the defaults. If a survey's Launch Template or Reminder Template is left on CultureMonkey Default, the platform sends its standard, well-crafted message for that email. Custom templates are there for when you want your own voice, branding, or wording.
Can I change the invitation email after the survey has started?
No. Once a survey is running or ended, the Launch Template is locked because the invitation has already been sent. The Reminder Template can still be changed while the survey is running, since reminders haven't all gone out yet. Always finalize your launch template before starting the survey.
Will merge fields work if I misspell them?
No. Merge fields must be typed exactly as listed on the edit form, including the double curly braces - for example {{employee_name}}. A misspelling or extra space won't be recognized and will appear as literal text in the email, so always preview and send a test before launching.
Can I send email templates in other languages?
Yes, if multilingual email templates are enabled for your account. After you save a template, a Translations tab lets you add versions in other languages, and both the preview and test email let you choose which language to view. See Translate email templates.
Do email templates affect anonymity?
No. Customizing the wording of an invitation or reminder doesn't change how responses are collected or protected. Anonymity is governed by your survey's settings and CultureMonkey's anonymity thresholds, not by the email copy.
Where to go next
- The whole picture: How CultureMonkey handles multiple languages
- Send templates in multiple languages: Translate email templates
- Customize feedback notification emails: Customize feedback notification emails
- See all the ways surveys reach employees: Distribution channels overview
Your feedback helps us improve the Help Center.