

Import employees from a CSV
A complete, step-by-step guide to bulk-uploading your people into CultureMonkey with a CSV - downloading the template, mapping fields, handling required vs optional columns, understanding how updates work, and fixing the errors that trip most imports up.
On this page
- When to use a CSV import
- Before you start
- Download the import template
- Required vs optional columns
- Map your fields
- Preview and import
- How updates and new records are handled
- Common import errors and how to fix them
- Best practices for a clean import
- Re-importing to update your data
- Frequently asked questions
- Where to go next
A CSV import is the fastest way to get your whole organization into CultureMonkey in one go. Instead of adding people one at a time, you upload a single spreadsheet - names, emails, teams, locations, managers and more - and CultureMonkey creates or updates every record for you.
This guide walks through the full import: where to start, how to download and fill in the template, which columns are required and which are optional, how CultureMonkey decides whether to create a new employee or update an existing one, and - most usefully - the validation errors you're likely to hit and exactly how to fix them. If you're setting up your account for the first time or doing a big refresh, this is the article to keep open.
Download the sample template, fill it in (keeping the column order), and upload it on the Import employees page. Map your columns to CultureMonkey's fields, preview, and import. Only four columns are truly required - First Name, Email Address, Team and Location. CultureMonkey matches rows by email address, so re-uploading the same file updates people rather than duplicating them.
When to use a CSV import
A CSV import is ideal when you're doing a point-in-time bulk load: your initial account setup, an annual data refresh, onboarding a new department, or correcting a batch of records. You stay in full control of the file and can review everything before it's applied.
If instead you want your employee list to stay in sync automatically - new hires added, leavers deactivated, team changes reflected without you lifting a finger - you probably want a live connection to your HR system instead. See Import employees from your HRIS. Many teams do both: a one-time CSV to get started, then an HRIS sync to keep things current.
For adding or editing just one or two people, skip the spreadsheet entirely and use Add employees.
Before you start
A clean import starts with clean source data. Before you build your file, make sure a few reference records already exist in your account, because the import validates against them rather than creating them silently:
- Teams and Locations you reference in the file should already exist in CultureMonkey. A row that names a team or location the system doesn't recognize will be flagged as an error.
- Managers you list in the Manager Email Address column must already exist as employees or managers. You can't point at a manager who isn't in the system yet.
- Decide your email hygiene up front - one valid, unique email per person. Email is the key CultureMonkey uses to match records, so duplicates or typos cause the most trouble.
If you're standing up a brand-new account, import (or create) your managers and confirm your teams and locations before the main employee file. That way every reference in your employee CSV resolves cleanly on the first pass instead of bouncing back as errors.
Download the import template
Always start from CultureMonkey's own template rather than a spreadsheet you build from scratch. The template has the exact column headers the importer expects, in the exact order it expects them.
- 1Open the import page - from the left navigation, go to General → Employees, then choose Import (the CSV import flow).
- 2Download the sample - click Download sample to get the template CSV. It includes every supported column and an example row so you can see the expected format.
- 3Fill in your data - replace the example row with your employees, one per row. Keep the header row exactly as provided and don't reorder the columns.
- 4Save as CSV (UTF-8) - export from Excel or Google Sheets as CSV UTF-8. Non-UTF-8 files are rejected.
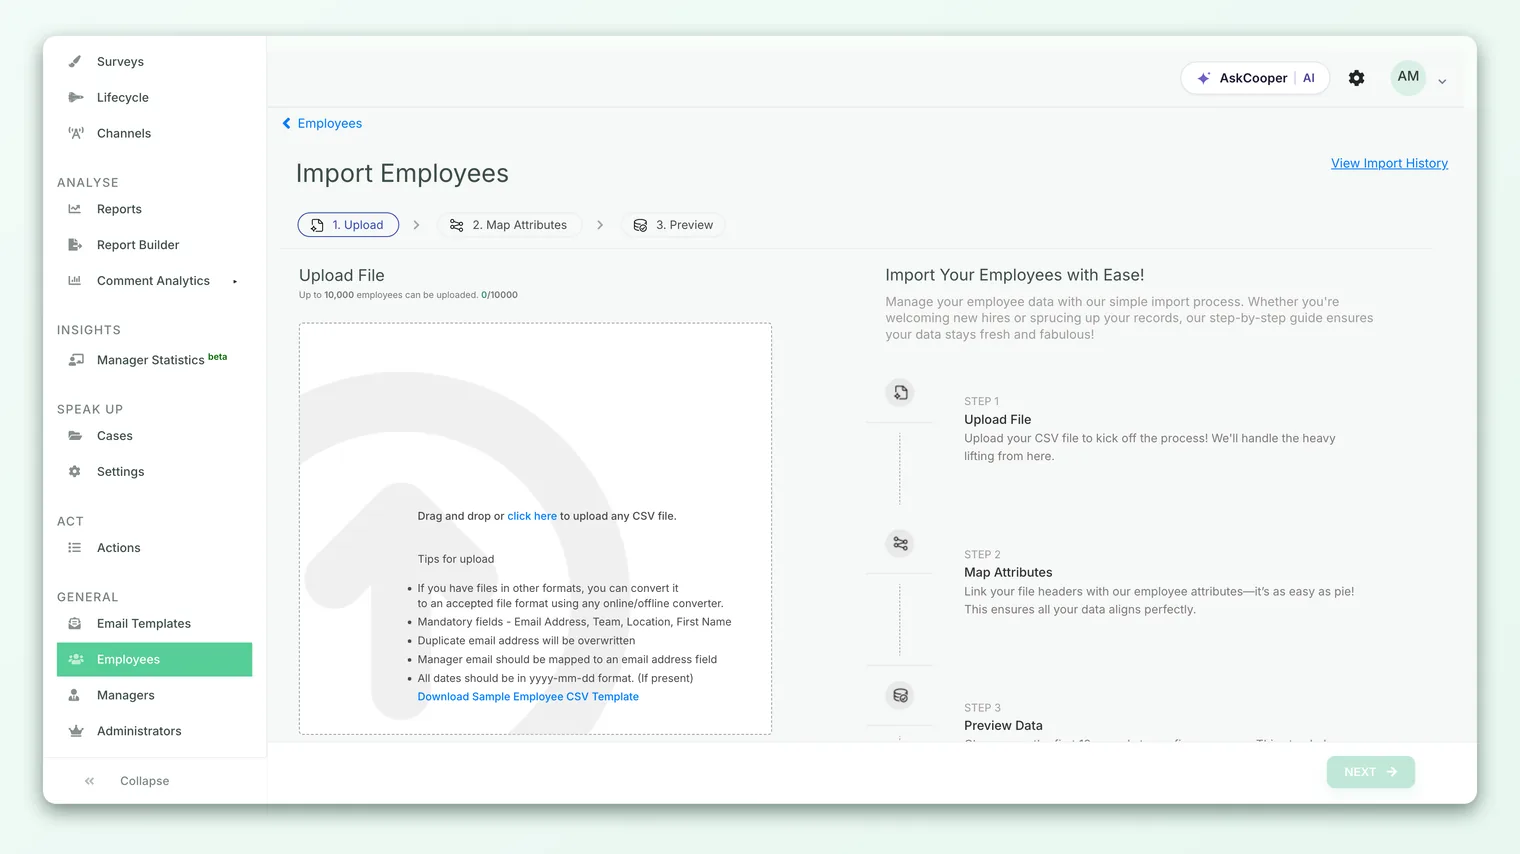
The importer checks your headers against the template and expects them in order. If you delete, rename or shuffle columns, you'll see an "Invalid headers" error. Edit the rows beneath the header row - never the header row itself.
Required vs optional columns
Only four columns are mandatory. Everything else is optional - include the columns you have good data for and leave the rest blank (or remove the extra columns, as long as you keep the required four and the overall order intact).
| Column | Field it maps to | Required? | Notes |
|---|---|---|---|
first_name | First Name | Required | 2-50 characters; no commas. |
email_address | Email Address | Required | Valid, unique email. This is the match key. |
team_name | Team | Required | Must match an existing team. |
location_name | Location | Required | Must match an existing location. |
last_name | Last Name | Optional | |
employee_id | Employee ID | Optional | Must be unique if provided. |
manager_email | Manager Email Address | Optional | Must belong to an existing manager. |
date_of_joining | Joining Date | Optional | Use a consistent date format. |
date_of_birth | Date Of Birth | Optional | |
phone_number | Phone Number | Optional | 8-40 characters. |
gender | Gender | Optional | male, female, or other. |
designation | Designation | Optional | Job title. |
subteam_name | Sub Team | Optional | Must match an existing sub team. |
business_unit_name | Business Unit | Optional | Must match an existing business unit. |
employee_type | Employee Type | Optional | See accepted values below. |
role_type | Role Type | Optional | See accepted values below. |
base | Base | Optional | Local, Non-local, or Expat. |
job_status | Job Status | Optional | Employed, On-Notice, or Relieved. |
is_active | Is Active | Optional | true or false. |
external_id | External ID | Optional | Must be unique if provided. |
question_language | Question Language | Optional | A language CultureMonkey supports. |
Some accounts also have a Business Group (business_group_name) column and can add custom attributes - extra demographic fields you've defined - as columns prefixed with cf_ (for example cf_department). For a full column-by-column reference and how the mapping is stored, see Map employee import fields.
Accepted values for the picklist fields
A few columns only accept a fixed set of values. Get these right and you'll avoid a whole class of errors:
| Column | Accepted values |
|---|---|
gender | male, female, other |
employee_type | Regular, Part-time, Shiftworker, Probation, Outworker |
role_type | Top-level, Mid-level, Operation level |
base | Local, Non-local, Expat |
job_status | Employed, On-Notice, Relieved |
is_active | true, false |
Map your fields
After you upload the file, CultureMonkey shows a field-mapping step. Here you match each column in your spreadsheet to the corresponding CultureMonkey attribute. If you started from the template, the columns line up automatically; if your file uses different header names, this is where you tell the importer that (say) your "Work Email" column is CultureMonkey's Email Address.
Your mapping is remembered for next time, so recurring imports of the same file get faster. For a deeper walkthrough of the mapping screen and how mappings are saved to your account, see Map employee import fields.
Preview and import
Once fields are mapped, you'll see a preview of your data under the correct CultureMonkey column headers. This is your last checkpoint before anything changes - scan a few rows to confirm names, emails and teams landed in the right places.
- 1Upload your CSV - on the Import employees page, choose your saved file. CultureMonkey checks the file type, encoding and size first.
- 2Map the columns - confirm each of your columns points to the right CultureMonkey field, then continue.
- 3Preview the data - review the sample rows shown under their mapped headers. If anything looks off, fix the CSV and re-upload before continuing.
- 4Run the import - confirm to start processing. Larger files are handled in the background in batches, so you don't have to wait on the page.
- 5Check the result - open the import history to see the status, how many records succeeded, and download the error file if any rows were rejected.
Because bigger files process in the background, the import history is where you confirm the final outcome - it records each upload with its status (Processing, Completed, or Error), the number of records imported, and a downloadable error file when something needs your attention.
How updates and new records are handled
You don't need a separate "update" flow. Every import both creates and updates in a single pass, and CultureMonkey decides which to do row by row.
The match key is the email address (compared case-insensitively):
- If an employee with that email already exists, their record is updated with the values in your file.
- If no employee has that email, a new employee is created.
This has a useful consequence: re-uploading a file is safe. Import the same list again with a few edits and CultureMonkey updates the matching people rather than creating duplicates. It's exactly how you'd do a bulk edit - change the values in the spreadsheet, re-import, done.
Because email is the match key, editing an existing employee's email in your CSV won't rename them - the importer won't find a match and will create a new person instead. To change an email, edit that employee's record directly rather than through a re-import.
Common import errors and how to fix them
Most failed imports come down to a handful of issues. When rows are rejected, CultureMonkey produces an error file in your import history: each rejected row is marked with an ERROR status and a plain-language reason, so you can fix just those rows and re-upload. Here are the ones you'll meet most often:
| What you'll see | What it means | How to fix it |
|---|---|---|
| Invalid file type! Please upload a CSV file. | The file isn't a .csv. | Re-save from Excel/Sheets as CSV, not .xlsx or .txt. |
| Invalid CSV file! Please upload a CSV file encoded in UTF-8. | Wrong text encoding. | Export as CSV UTF-8 specifically. |
| File size is more than 2mb… | The file is too large - often from empty rows/columns. | Delete blank trailing rows and columns; split very large lists into batches. |
| Invalid headers! Please refer to the sample file and preserve the order of the columns. | Headers were renamed, removed or reordered. | Start again from the downloaded template; edit only the data rows. |
| Invalid email address | A value in the email column isn't a valid email. | Correct the typo; make sure every required row has an email. |
| Email has already been taken | A duplicate email exists in the file or the account. | Remove the duplicate row, or check whether that person already exists. |
| team_name: … Should be an existing team | The named team doesn't exist yet. | Create the team first, or fix the spelling to match exactly. |
| location_name: … Should be an existing location | The named location doesn't exist. | Create the location first, or correct the value. |
| … Should be an existing manager | The manager email isn't a known manager. | Add that manager first, or fix the email. |
| Self reference for manager is invalid… | A person is listed as their own manager. | Leave manager_email blank for that row instead. |
| role_type: should be Top-level or Mid-level or Operation level | An invalid picklist value. | Use one of the exact accepted values. |
| base: should be Expat or Local or Non local | An invalid base value. | Use Local, Non-local, or Expat. |
| employee_type: should be Regular / Part-time / Shiftworker / Probation / Outworker | An invalid employee type. | Use one of the accepted values. |
| first name … cannot contain a comma | A comma in the first name breaks the CSV. | Remove the comma from that name. |
| employee_id has already been taken | Duplicate Employee ID. | Make each Employee ID unique, or leave it blank. |
| question_language: is not supported… | An unsupported language code. | Use a supported language, or contact support@culturemonkey.io. |
The error file only contains the rows that failed. You don't have to re-run your whole list - correct just those rows and re-upload. Since matching is by email, the successful rows from the first pass simply get updated harmlessly.
Best practices for a clean import
A little discipline in the spreadsheet saves a lot of error-file cleanup later:
- Always start from the fresh template. Don't reuse an old export with edited headers - download the current sample each time.
- Fill the four required columns for every row. First Name, Email Address, Team and Location are non-negotiable.
- Match reference values exactly. Team, Location, Sub Team and Business Unit names must match what's already in CultureMonkey, character for character.
- Use one consistent date format across all date columns in the file.
- Keep emails clean and unique. No duplicates, no typos, no shared inboxes standing in for individuals.
- Trim blank rows and columns. Empty cells inflate file size and can trip the 2MB limit.
- Do a small test first. For a large rollout, import 10-20 rows, confirm they look right, then run the full file.
Re-importing to update your data
Treat the CSV as your bulk-editing tool. To make changes across many employees at once - new managers after a reorg, updated designations, corrected locations - edit those values in the spreadsheet and import the file again. CultureMonkey matches on email and updates the existing records in place.
The only value you can't safely change this way is the email address itself, since that's the match key (see the warning above). For everything else, re-import is the quickest path to a bulk update. If you find yourself doing this every week, that's a strong sign it's time to move to an HRIS sync so the updates happen automatically.
Frequently asked questions
Which columns are actually required?
Just four: First Name, Email Address, Team, and Location. Every other column is optional - include the ones you have data for and leave the rest blank.
Will re-uploading the same file create duplicate employees?
No. CultureMonkey matches each row to an existing person by email address. Matching rows are updated in place; only genuinely new emails become new records. That's exactly why re-import doubles as a bulk-edit tool.
One of my rows was rejected but the rest imported. Is that normal?
Yes. The import processes row by row, so valid rows go through while invalid ones are collected in an error file with the reason. Fix those rows and re-upload - the ones that already succeeded will simply be updated again.
Why does the importer say my team or location "should be an existing" one?
The import validates references rather than creating them on the fly. Create the team, location, sub team or business unit first (or correct the spelling to match exactly), then re-import.
How do I change an employee's email address?
Not through a CSV re-import - because email is the match key, a changed email is read as a new person. Edit that employee's record directly instead. See Add employees.
Is there a file size limit?
Yes - the file must be under 2MB. Blank trailing rows and columns are the usual culprit when a modest list exceeds it. Trim them, or split very large lists into a few batches.
Where to go next
- The whole picture: How CultureMonkey handles multiple languages
- Understand the columns in depth: Map employee import fields
- Keep your list in sync automatically: Import employees from your HRIS
- Add or edit just one person: Add employees
Your feedback helps us improve the Help Center.