

Map your import fields to CultureMonkey attributes
A complete guide to field mapping during employee imports - what it is, how to match your CSV or HRIS columns to CultureMonkey's employee attributes, how to handle extra or mismatched columns, how mappings are saved for re-use, and the mistakes to avoid.
On this page
- What field mapping is - and why it matters
- Where mapping happens in the import flow
- The standard employee attributes you can map to
- Mapping custom attributes
- Example mappings
- Handling mismatched or extra columns
- Saving and re-using a mapping
- Mapping for HRIS imports
- Common mapping mistakes
- Frequently asked questions
- Where to go next
Whenever you bring people into CultureMonkey - whether from a spreadsheet you exported this morning or from a live HRIS integration - the platform has to figure out which of your columns means what. Your file might call it "Work Email"; CultureMonkey calls it Email Address. Your HRIS might label a column "firstName"; CultureMonkey expects First Name. Field mapping is the step where you connect the two, telling CultureMonkey exactly which of your source columns fills each of its employee attributes.
Get mapping right and every import after it becomes almost effortless - the platform remembers what you told it and pre-fills the same choices next time. Get it wrong and you'll see people land in the wrong team, managers that don't link up, or blank fields where data should be. This guide walks through what mapping is, how to do it for both CSV and HRIS imports, how CultureMonkey handles the columns you don't map, and the handful of mistakes that trip people up most often.
Field mapping matches each column in your source file to a CultureMonkey employee attribute. You must map the four mandatory fields - First Name, Email Address, Team, and Location - plus any optional standard fields and custom attributes you want to fill. Columns you don't map are simply ignored, and CultureMonkey saves your mapping so future imports reuse it automatically.
What field mapping is - and why it matters
CultureMonkey stores each employee as a set of attributes: their name, work email, team, location, manager, joining date, and so on, plus any custom attributes your organization has defined. Your source data - a CSV export or an HRIS feed - has its own column names, which almost never match CultureMonkey's exactly. Mapping is the translation layer between the two.
It matters for three practical reasons:
- Accuracy. The email you map becomes the address surveys are sent to, and the field you choose as the unique identifier is how CultureMonkey decides whether a row updates an existing person or creates a new one. A mis-mapped column can duplicate people or send invitations to the wrong inbox.
- Structure. Team, location, and manager mappings build the org structure that powers every report filter and every manager's dashboard. If these are wrong, your analytics are wrong.
- Reuse. A mapping done carefully once is remembered and reused, so your monthly or quarterly refresh takes seconds instead of a fresh round of guesswork.
Mapping applies to both import routes. A one-off CSV upload and a scheduled HRIS sync both funnel through the same set of CultureMonkey attributes - only the source and the way you configure the match differ, which we cover below.
Where mapping happens in the import flow
For a CSV import, mapping is the middle step of a short, guided flow. You start on the employee import page, upload your file, and CultureMonkey reads your column headers so it can offer them as choices.
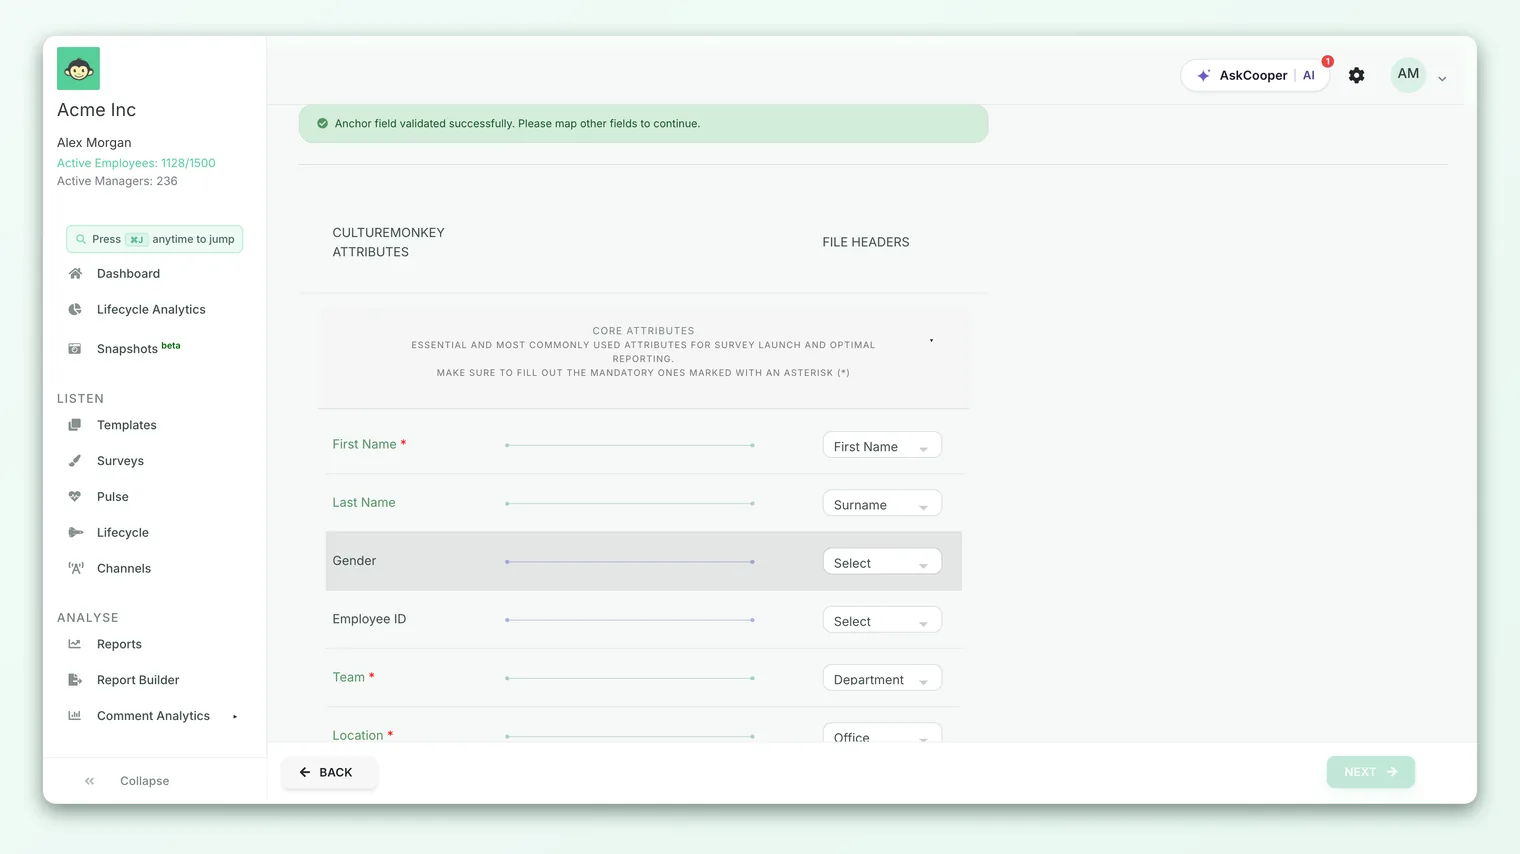
- 1Upload your file - choose your CSV (UTF-8 encoded, up to 5 MB). CultureMonkey reads the header row and pulls out your column names.
- 2Choose your unique identifier - pick the field that uniquely identifies each person, known as the anchor field. You can use Email Address, Employee ID, or External ID. CultureMonkey checks that this column has no duplicate values before letting you continue.
- 3Map your columns - for each CultureMonkey attribute, select the matching column from your file. Mandatory fields are marked and must be filled; everything else is optional.
- 4Preview the result - CultureMonkey shows the first ten rows exactly as they'll be imported, so you can confirm the data lines up under the right attributes before committing.
- 5Run the import - once the preview looks right, start the import. Your mapping is saved at this point so it's ready to reuse next time.
If something looks off in the preview, step back to the mapping screen and adjust - nothing is written to your employee list until you confirm the final step.
The standard employee attributes you can map to
CultureMonkey exposes a fixed set of standard attributes as mapping targets. Four of them are mandatory - an import won't proceed until each is mapped to a column. The rest are optional; map the ones you have and leave the rest unmapped.
| CultureMonkey attribute | Mandatory? | What it holds |
|---|---|---|
| First Name | Yes | The employee's given name |
| Email Address | Yes | Work email; used to send surveys and as a possible unique identifier |
| Team | Yes | The team the person belongs to (a core reporting dimension) |
| Location | Yes | The person's location or site |
| Last Name | No | Family name |
| Employee ID | No | Your internal ID; can serve as the unique identifier |
| Manager Email Address | No | The work email of the person's manager, used to build reporting lines |
| Designation | No | Job title |
| Sub Team | No | A finer division beneath Team |
| Business Unit | No | Higher-level grouping above Team |
| Business Group | No | Top-level grouping (available when business-group access is enabled) |
| Gender | No | Used for demographic breakdowns |
| Date Of Birth | No | Date of birth |
| Joining Date | No | Date the person joined |
| Date Of Separation | No | Date the person left, if applicable |
| Phone Number | No | Contact number |
| External ID | No | An identifier from an external system; can serve as the unique identifier |
| Job Status | No | Employment status flag |
| Is Active | No | Whether the person is currently active |
| Question Language | No | Preferred survey language for the employee |
You don't have to map every optional field - most organizations map a core handful (name, email, team, location, manager, joining date, designation) and add more over time. The four mandatory fields are the only ones you can't skip.
The anchor field is how CultureMonkey matches a row to an existing employee on re-import. Email Address is the most common choice, but if people occasionally change email addresses, a stable Employee ID or External ID is safer - it keeps the same person's record intact across changes.
Mapping custom attributes
Beyond the standard fields, your organization can define custom employee attributes - things like Cost Center, Department Code, Employment Type, or Shift. These appear in the mapping screen as their own set of targets, listed alongside the standard fields, so you can map source columns to them exactly the same way.
In a CSV, custom attributes are recognized by a cf_ prefix on the column header (for example, cf_cost_center maps to your "Cost Center" custom attribute). If you're building your file from a downloaded sample template, the custom-attribute columns already carry the correct prefix, so you rarely have to think about it. In the mapping UI, they show with their friendly display name - cf_cost_center reads as "Cost Center."
Custom attributes come in a few types, and their values are validated on import:
- Dropdown attributes only accept values that match one of the options you configured. A value that isn't in the list is flagged as an error.
- Checkbox attributes expect
trueorfalse. - Textbox attributes accept free text.
If you haven't set up the custom attributes you need yet, do that first - see Add custom employee attributes. They have to exist before they can appear as mapping targets.
Example mappings
The table below shows how columns from a few typical sources translate to CultureMonkey attributes. Your headers will differ, but the pattern is always the same: pick the CultureMonkey attribute, then choose the source column that fills it.
| Your source column | CultureMonkey attribute | Notes |
|---|---|---|
Work Email / email / emailAddress | Email Address | Common anchor field; must be unique |
First Name / firstName / given_name | First Name | Mandatory |
Surname / lastName | Last Name | Optional |
Department / dept | Team | Mandatory; drives report filters |
Office / site / city | Location | Mandatory |
Reports To / manager_email | Manager Email Address | Use the manager's email, not their name |
Title / job_title | Designation | Optional |
Start Date / hire_date | Joining Date | Use a consistent date format |
Staff No / emp_id | Employee ID | Alternative anchor field |
cf_cost_center | Cost Center (custom) | Prefixed cf_ in the file |
Notice the manager row: CultureMonkey links reporting lines by email, so the column you map to Manager Email Address must contain the manager's work email - a column of manager names won't build the hierarchy.
Handling mismatched or extra columns
Real exports are messy. They often carry columns CultureMonkey has no home for - payroll codes, badge numbers, internal flags - and they sometimes label familiar fields in unfamiliar ways. Mapping handles both gracefully.
- Extra, unmapped columns are ignored. If your file has a column you never map to any attribute, CultureMonkey simply drops it. The import proceeds with only the columns you mapped; nothing is imported from the leftovers, and no error is raised. You don't need to delete unwanted columns from your file before uploading - leaving them in is harmless.
- Mismatched names are exactly what mapping is for. Your header saying "Work Email" while CultureMonkey says "Email Address" is not a problem - that's the mismatch mapping resolves. Just point the Email Address attribute at your "Work Email" column.
- Missing mandatory fields block the import. If your file has no column that fits one of the four mandatory attributes, you'll be stopped at the mapping step until you provide one. If a mandatory piece of data genuinely isn't in your source, you'll need to add it to the file first.
- Invalid custom-attribute values are reported. A Dropdown value that isn't one of the configured options, or a Checkbox value that isn't
true/false, is caught during import and listed so you can correct it.
The preview step exists precisely to catch mapping slips - a date column mapped to the name field, or team and location swapped. Because unmapped columns vanish silently, the preview is your best chance to notice that a column you meant to map didn't get mapped. Always scan those first ten rows before running the import.
Saving and re-using a mapping
You only have to think hard about mapping once. When you run an import, CultureMonkey saves the mapping you used at the account level. The next time you start an import, it loads that saved mapping and pre-fills the dropdowns for you - so if your export format stays consistent month to month, mapping becomes a quick glance-and-confirm rather than a fresh setup.
A few things worth knowing about how this works:
- The saved mapping is per account, so it's shared across admins who run imports - everyone benefits from the mapping being set up once.
- It's remembered, not locked. You can override any pre-filled choice on any import; whatever you use most recently becomes the new default.
- Because it keys on your column names, it works best when your export keeps the same headers each time. If you change your export format, just re-check the mapping - CultureMonkey will fill in what it can and leave the rest to you.
This is the single biggest reason to keep your export format stable: a consistent file plus a saved mapping turns a recurring import into a two-minute task.
Mapping for HRIS imports
If you sync from an HRIS - such as BambooHR, Darwinbox, Zoho People, Workday, Keka, or Freshservice - the concept is identical: each CultureMonkey attribute is matched to a source field. The mechanics differ in a few useful ways because the source is a live system rather than a file you upload.
- The source is a provider field, not a column. Instead of picking a CSV header, each CultureMonkey attribute is matched to a field coming from your HRIS (for example, the provider's
firstNamemaps to First Name). - Mapping can transform data, not just copy it. HRIS mapping supports light transformations - for instance, splitting a delimited "department hierarchy" string and taking a specific segment to fill Sub Team. This is handy when your HRIS packs several levels of structure into one field.
- Custom attributes map the same way. Provider fields can feed CultureMonkey custom attributes just as they feed standard ones.
The end result is the same: your people arrive in CultureMonkey with the right attributes filled. For the full setup, see Import employees from your HRIS. For one-off or ad-hoc updates, the CSV import with its guided mapping is usually the quicker route.
Common mapping mistakes
A little care up front avoids almost all import headaches. The mistakes below are the ones we see most often:
- *Mapping manager names instead of emails. Reporting lines are built from Manager Email Address*. A column of manager names won't connect anyone - map the manager's work email.
- Choosing a volatile anchor field. If email addresses change in your organization, using Email Address as the unique identifier can create duplicate records. Prefer a stable Employee ID or External ID.
- Swapping Team and Location. These are both mandatory and easy to reverse in the dropdowns. The preview makes the swap obvious - look for it.
- Inconsistent date formats. Joining Date, Date Of Birth, and Date Of Separation need a consistent, valid format across the whole file. Mixed formats cause rows to fail.
- Forgetting to create custom attributes first. A custom attribute has to exist in CultureMonkey before it shows up as a mapping target. Set them up ahead of the import.
- Assuming unmapped means "kept." Any column you don't map is dropped. If a field matters, make sure it's actually mapped - don't rely on it carrying over just because it's in the file.
Frequently asked questions
Do I have to map every column in my file?
No. Map the four mandatory fields - First Name, Email Address, Team, and Location - plus any optional or custom fields you want to fill. Any column you don't map is ignored, so extra columns in your export are harmless and don't need to be removed.
What happens to columns I don't map?
They're silently dropped. The import uses only the columns you mapped, and no error or warning is raised for the rest. That's why the preview step is worth a careful look - a field you meant to map but didn't will simply be missing.
Will I have to redo the mapping every time I import?
Usually not. CultureMonkey saves your mapping at the account level and pre-fills it on your next import. As long as your file keeps the same column headers, you'll mostly be confirming an existing mapping rather than building a new one. You can override any choice whenever you need to.
How do I map a custom field like Cost Center?
Create the custom attribute first (see Add custom employee attributes), then it appears as a mapping target alongside the standard fields. In a CSV, the matching column is prefixed with cf_ (for example cf_cost_center); the mapping screen shows it by its friendly name.
Can I change the field I use as the unique identifier?
Yes. On the CSV import flow you choose the anchor field - Email Address, Employee ID, or External ID - before mapping. Pick the one that's most stable for your organization, since it's how CultureMonkey decides whether a row updates an existing person or creates a new one.
Is mapping different for HRIS imports?
The idea is the same - each CultureMonkey attribute is matched to a source field - but HRIS mapping pulls from live provider fields instead of file columns and can apply light transformations (like splitting a combined field). See Import employees from your HRIS for the details.
Where to go next
- Do a file-based import: Import employees from a CSV
- Set up an automated sync: Import employees from your HRIS
- Add fields to map to: Add custom employee attributes
Your feedback helps us improve the Help Center.