

Invite admins
How to add administrators to your CultureMonkey account - choosing between Super Admin and Sub Admin, filling in the create-administrator form, setting survey access, and walking a new admin through the invitation, confirmation and set-password activation flow.
On this page
Bringing another person into the admin side of CultureMonkey is one of the first things most account owners need to do. Maybe you want a co-owner on the People team who can run the whole program with you, or a regional HR partner who should only see their own division. Either way, the mechanics are the same: you add them as an administrator, choose how much they can see, and CultureMonkey emails them an invitation to activate their own login.
This guide walks through the whole process - deciding between a Super Admin and a Sub Admin, filling in the create-administrator form, configuring which surveys the person can open, and understanding the invitation → confirmation → set-password flow that turns an invite into a working account. It also covers the housekeeping: resending an invitation that got lost, and removing an admin who no longer needs access.
Only a Super Admin can invite other admins. Go to General → Administrators, click Add Administrator, enter the person's name and email, and pick their access level: Super-admin (full control) or Sub-admin (scoped to the teams, locations and surveys you assign). CultureMonkey emails them an invite; they click the link, set a password, and they're in. Until they do, their status shows Awaiting Confirmation.
Before you start
A few things are worth knowing before you add anyone:
- You must be a Super Admin. Adding, editing and removing administrators is a Super-Admin-only capability. Sub Admins and Managers don't see the Administrators page. If you can't find it, you're probably signed in with a scoped role.
- An admin is layered on an employee record. When you invite someone, CultureMonkey creates both an employee record and an admin login for them, linked together. This is why the create form looks like an employee form - the person becomes part of your people data as well as gaining a login.
- Keep the Super Admin list short. A Super Admin can see every employee's results, including small teams. Reserve that level for the handful of people who genuinely need account-wide control, and use Sub Admin for everyone else. For the full breakdown of what each role can do, read Understanding roles in CultureMonkey.
Super Admin vs Sub Admin
The single most important decision when inviting someone is how much they should be able to see and do. CultureMonkey offers two administrator levels, and the difference is all about scope.
| Super Admin | Sub Admin | |
|---|---|---|
| Best for | Program owners, HR/People leaders, the account owner | Regional partners, divisional leads, anyone who owns part of the org |
| Data they see | Every employee, team and location | Only the segments you assign them |
| Invite & manage other admins | Yes | No |
| Import employees, edit account settings | Yes | No |
| Configure integrations & email templates | Yes | No |
| Create surveys & view reports | For the whole org | For their assigned employees only |
| Manage actions | All actions | Their own / assigned actions |
| Survey access | All surveys | Set per admin (All / Lifecycle / Custom) |
A Super Admin has full control. A Super Admin is unscoped, so their access covers the whole account. The person who signs your organization up is the first Super Admin.
A Sub Admin is a scoped administrator. They can create surveys, view reports and work on actions, but only for the teams, locations, business units and business groups you assign. Leave that scope empty and a Sub Admin can see everyone - so always confirm you've selected at least one segment when you mean to limit someone. Scoping is covered in depth in Restrict sub-admin data.
It's much easier to grant more access than to explain why someone saw results they shouldn't have. When you're unsure, invite the person as a Sub Admin scoped to what they need - you can always promote them to Super Admin later from their profile.
Opening the Administrators page
Everything starts from the Administrators page, which lives under the General section of the left navigation, alongside Employees and Managers.
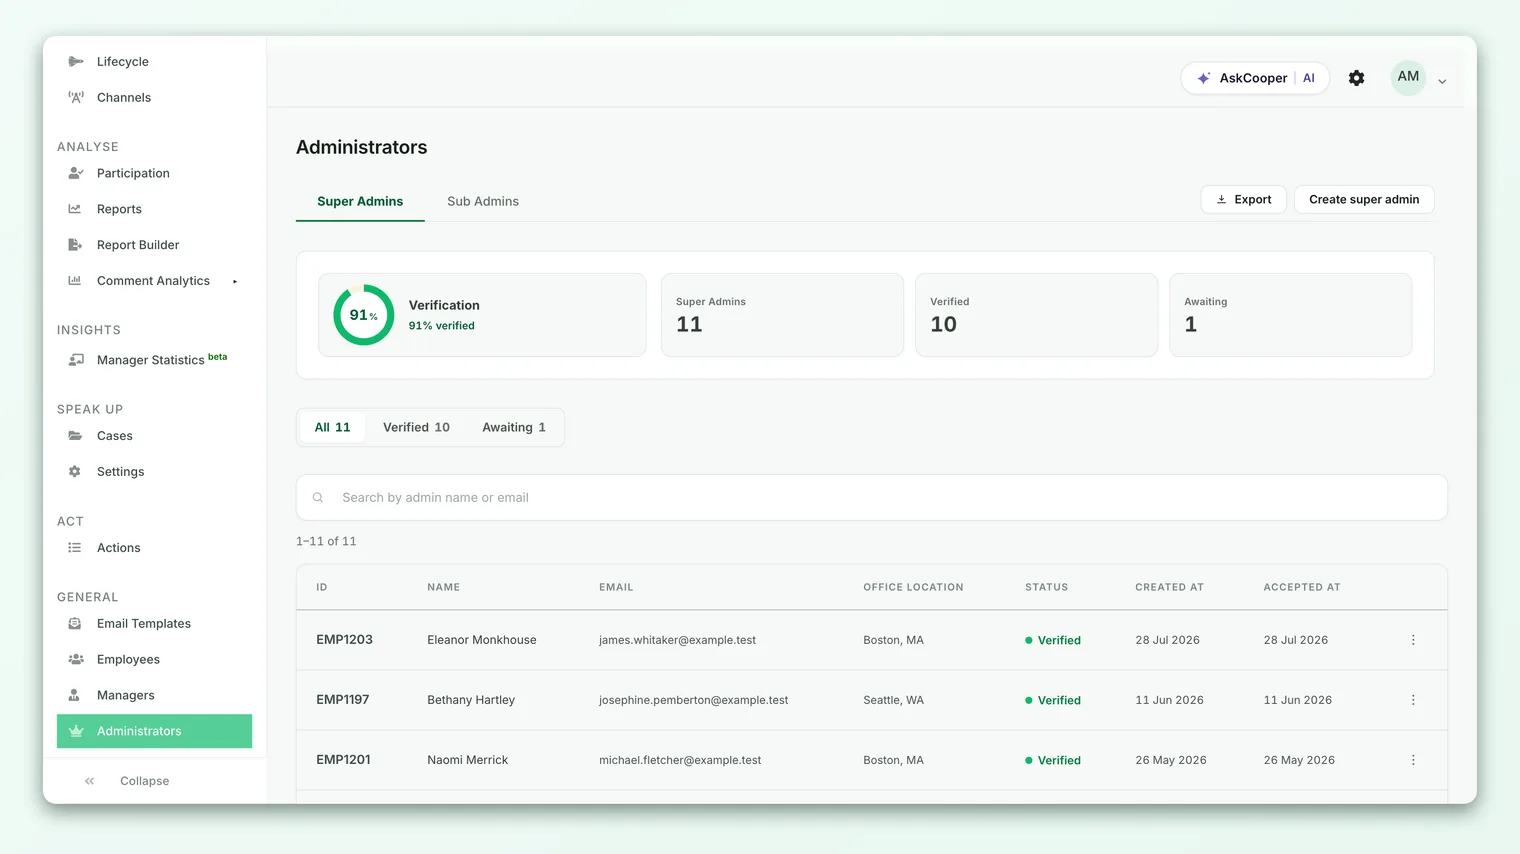
The list separates admins into Super Admins and Sub Admins tabs, and each row shows the person's role, their status (either Verified or Awaiting Confirmation), and when they accepted. To add a new person, click Add Administrator in the top corner, which opens the create-administrator form.
Filling in the create-administrator form
The form for a new admin is the standard employee form, because you're creating an employee record and an admin login at the same time. You don't need to complete every field - but a handful are required, and one section (Access Permissions) is what turns the person into an admin rather than just an employee.
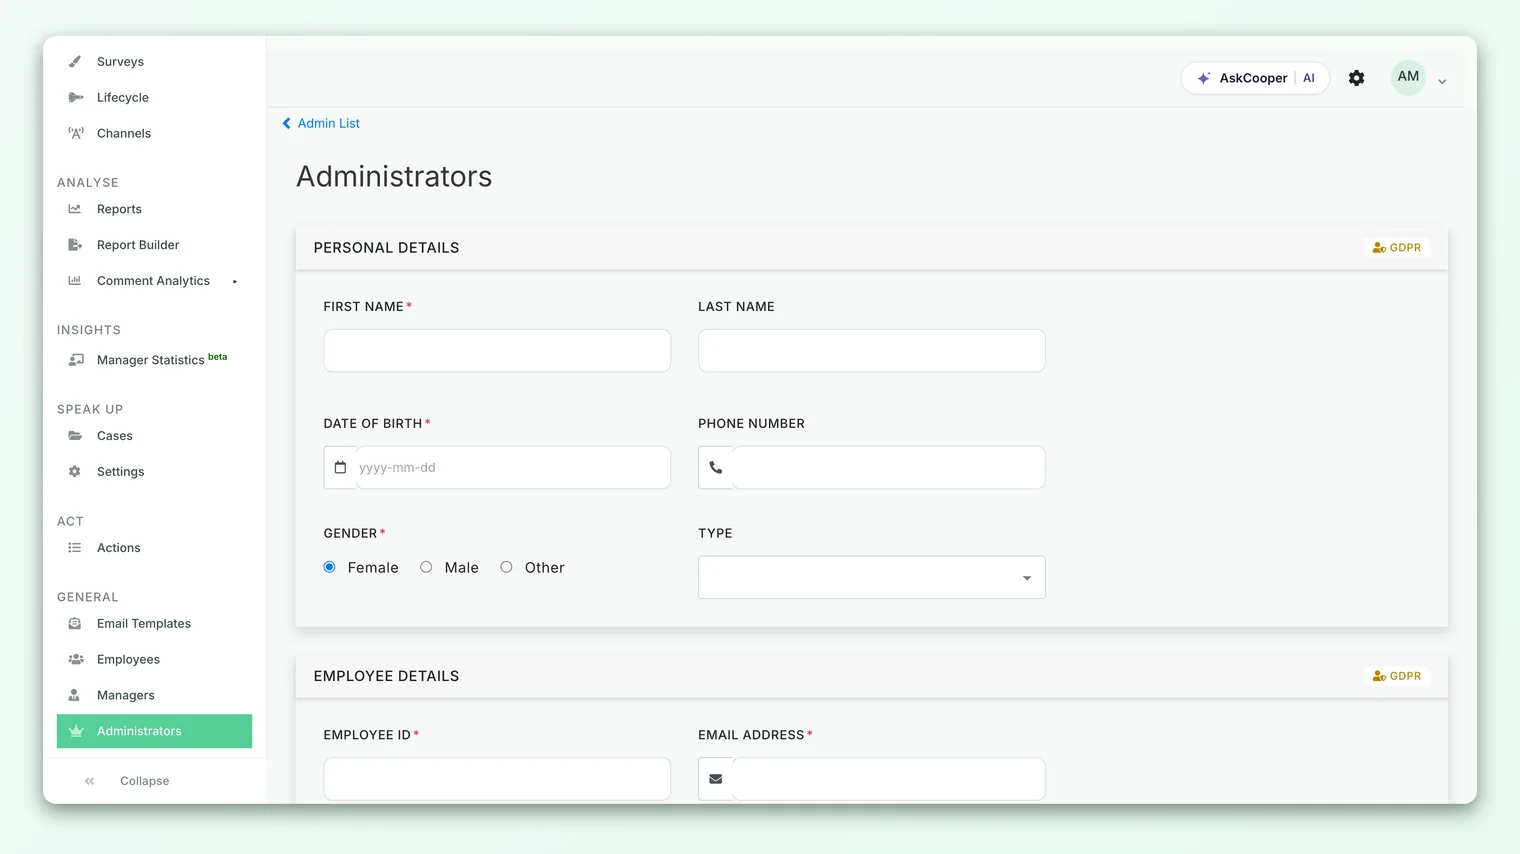
The core fields
- First Name (required) - the person's first name.
- Last Name - their surname.
- Email Address (required) - where the invitation is sent, and the address they'll sign in with. Double-check it: a typo here means the invite never arrives.
- Employee ID, Designation, Date of Birth and a few other employee details may be required depending on how your account is configured, since the admin also becomes part of your people data.
The Access Permissions section
This is the part that matters most. Under Access Permissions you'll see a set of checkboxes that grant login access:
- Super-admin - "Full access to invite and revoke user access, import employees, manage and view organisation level survey & reports." Tick this for a full-control administrator.
- Sub-admin - "Access surveys, reports and actions for the employees under the selected teams, locations and business units." Tick this for a scoped administrator, then choose the segments below.
- Manager - a separate access level for people-leaders; it stays disabled unless the person has at least 3 direct reports. This is different from an admin invite and is covered in Understanding roles.
When you tick Sub-admin, additional multi-select fields appear so you can define the scope:
- 1Manage Business Groups - the business groups this Sub Admin can access (if enabled on your account).
- 2Manage Teams - the teams whose results they can see.
- 3Manage Locations - the office locations they're responsible for.
- 4Manage Business Units - the business units in their remit.
- 5Manage Sub Teams - sub teams, where your account uses them.
If you tick Sub-admin but don't select a single business group, team, location or business unit, the Sub Admin gets access to all employees - effectively an unscoped admin. Whenever you intend to limit someone, confirm at least one segment is selected before you save.
Configuring survey access
Beyond which people an admin can see, you can control which surveys they can open. When Survey Access is enabled on your account, a Survey Access dropdown appears in the form with three options:
| Option | What the admin can open |
|---|---|
| All Surveys | Every survey, regardless of type. This is the default. |
| Lifecycle Surveys Only | Only lifecycle / autopilot journeys (onboarding, exit, and similar). |
| Custom Surveys Only | Only your custom surveys - not lifecycle journeys. |
The help text under the dropdown adapts to the role you're inviting: "Select which surveys this admin / sub-admin can access."
This setting is genuinely useful for keeping sensitive results contained. For example, you can give a recruiter Lifecycle Surveys Only so they see onboarding sentiment without ever opening your annual engagement survey. Every new admin starts on All Surveys unless you change it, so set it deliberately when you want to narrow things down.
For a deeper walkthrough of these options and how they interact with a Sub Admin's people-scope, see Manage sub-admin access to surveys.
Survey Access is stored on each admin individually, not globally. That means two Sub Admins scoped to the same team can still have different survey access - one on All Surveys, another on Lifecycle Surveys Only. Set it per person based on what they actually need to see.
Once the fields are filled in, click Create Administrator at the bottom of the form. CultureMonkey saves the new admin, links their employee record, and immediately kicks off the invitation flow.
The activation flow: invitation → confirmation → set password
Creating an admin doesn't give them access on its own. The person has to activate their own account by setting a password - and that's deliberate, so no one else ever knows their credentials. Here's exactly what happens.
- 1You create the admin. On save, CultureMonkey generates a one-time invitation token for the new admin and marks their status as Awaiting Confirmation. No password exists yet.
- 2CultureMonkey emails the invitation. An invite lands in the person's inbox (subject line along the lines of "Your colleague invited you as an admin on CultureMonkey 🐵"). It contains a secure link back to your account.
- 3They click the link. The link opens a confirmation page at
app.culturemonkey.io/admins/confirm/…carrying their invitation token. CultureMonkey verifies the token and signs them in. - 4They set a password. On the Set Password page they choose a password and click Get Started. The password must be at least 8 characters and include an uppercase letter, a lowercase letter, a number and a special character.
- 5They're in. CultureMonkey records the moment they verified, clears the one-time token so the link can't be reused, and drops them onto the dashboard. Their status on the Administrators page flips to Verified.
Until the person completes that last step, they show as Awaiting Confirmation in your admin list - a handy way to see, at a glance, who still needs to accept.
The invitation link works exactly once. After the person sets their password, the token is cleared, so an old invite email can't be used to get in later. If someone needs the link again, you resend the invite (below) - which issues a fresh one.
Resending an invitation
Invites get lost - filtered into spam, deleted by accident, or simply ignored until they expire from memory. If an admin still shows Awaiting Confirmation, you can send them a fresh invitation.
- 1Open the Administrators page and find the person on the relevant tab. They'll be marked Awaiting Confirmation.
- 2Open the row's menu - use the actions dropdown at the end of their row.
- 3Choose "Resend Invite." CultureMonkey emails a new invitation with a fresh link and confirms "Invite sent successfully!"
Two things to know. First, Resend Invite only appears for admins who haven't verified yet - once someone is Verified, there's nothing to resend. Second, there's a cooldown between resends to prevent inbox-flooding: if you try again too soon, CultureMonkey tells you how long you need to wait before another invite can go out. This interval is an account-level setting.
A repeatedly missing invite is almost always a mail-delivery issue rather than a CultureMonkey one. Ask the recipient to check spam and quarantine, confirm the email address on their record is spelled correctly, and - if your IT team filters aggressively - have them allowlist CultureMonkey's sending domain.
Deactivating an admin
When someone changes roles or leaves, you'll want to remove their access. CultureMonkey handles this as a soft deactivation rather than a hard wipe: the admin is marked as removed and their role is cleared, but the underlying record is retained so nothing is lost by accident.
To remove an admin, open their record from the Administrators page and use the removal option there. When you do:
- Their role is cleared and their login access is revoked immediately.
- CultureMonkey sends them an access-revoked email so they know their access has ended.
- They disappear from the active admin lists.
Deactivating an admin never touches survey responses or historical results - it only removes the person's ability to log in. Because the removal is a soft one, access can be restored if it was ended in error; reach out to support if you need a removed admin brought back.
Removing someone's admin access is different from deleting them as an employee. Marking a person inactive on their employee record also ends their admin access, but it additionally pulls them out of future surveys. If you only want to revoke a login - not remove the person from your engagement data - remove the admin access, don't deactivate the employee.
Frequently asked questions
Who is allowed to invite new admins?
Only Super Admins. The Administrators page and the Add Administrator form are hidden from Sub Admins, Managers and Report Viewers. If you need to add an admin and can't find the page, you're signed in with a scoped role and need a Super Admin to either do it or promote you.
The person I invited still can't log in - what's wrong?
Check their status on the Administrators page. If it reads Awaiting Confirmation, they haven't completed activation yet - they need to click the link in their invitation email and set a password. If the email never arrived, resend the invite and have them check spam. Only once their status shows Verified can they sign in.
Can I change someone from a Sub Admin to a Super Admin later?
Yes. Open their record from the Administrators page and adjust the Access Permissions section - untick Sub-admin, tick Super-admin (or vice versa), and save. You don't need to re-invite them; the change takes effect on their existing login.
What happens if I leave a Sub Admin's scope empty?
They get access to all employees, the same as an unscoped admin. An empty scope is treated as "everything," so always select at least one business group, team, location or business unit when you intend to limit a Sub Admin.
Does removing an admin delete their survey answers?
No. Removing admin access only revokes the person's login. Their past responses, and everyone else's results, are untouched. Deactivation is also soft, so access can be restored if it was ended by mistake.
Why can't I resend an invite right away?
There's a built-in cooldown between resends to avoid flooding someone's inbox. If you try again too soon, CultureMonkey shows how long you need to wait. The exact interval is configured at the account level.
Where to go next
- Scope which surveys an admin sees: Manage sub-admin access to surveys
- Limit which employees a Sub Admin can access: Restrict sub-admin data
- Understand every role in CultureMonkey: Understanding roles in CultureMonkey
Your feedback helps us improve the Help Center.