

Create a survey from scratch
A complete, step-by-step guide to building a custom survey in CultureMonkey - from naming and branding, through every question type and audience option, to choosing a channel, scheduling reminders, previewing and launching.
On this page
- Custom survey or template?
- Before you start: roles and prerequisites
- Step 1 - Basic settings
- Step 2 - Questions
- Step 3 - Audience
- Step 4 - Settings: channel, schedule and reminders
- Preview and test before you launch
- Launch the survey
- What you can and can't edit on a live survey
- Monitor participation after launch
- Best practices
- Frequently asked questions
- Where to go next
When you want full control over your questions, your audience and how the survey looks, you build a custom survey. CultureMonkey walks you through it as a guided builder - Basic → Questions → Audience → Settings - and lets you preview and test the whole experience before a single invitation goes out.
This guide covers the entire flow end to end: how it differs from starting with a template, what you need before you begin, every setting on each step, every question type, how to schedule and send, what you can and can't change once the survey is live, and how to keep an eye on it after launch.
Go to Listen › Surveys and click Create a survey. Work through four steps - Basic (name, look, identity), Questions (your content), Audience (who receives it) and Settings (channel, schedule and reminders) - saving with Save & Continue as you go. Preview it as a participant, then Publish this survey. Once it's live, CultureMonkey locks most settings, so get them right first.
Custom survey or template?
You have two ways to start, and they lead to the same builder:
- From a template. Open Listen › Templates and pick a research-backed survey - engagement, onboarding, exit, pulse and more. The questions, drivers and structure are already filled in; you just review and tweak. This is the fastest route and a great default. See Browse and use survey templates.
- From scratch. Start with a blank survey and build exactly the sections and questions you want. Choose this when you have specific questions to ask, a bespoke structure, or a survey that doesn't fit any template.
Everything below applies to both paths - a template simply gives you a head start on Step 2. If you're new to CultureMonkey, starting from a template and customizing it is usually the smoother introduction.
Starting from a template doesn't lock you in. Once it opens in the builder you can add, remove, reword or reorder anything, so there's no penalty for picking a template as a starting point and reshaping it.
Before you start: roles and prerequisites
A few things need to be in place before you build:
- The right role. You need a role that can create surveys - typically Survey Admin or Account Admin. If you don't see Create a survey, ask an administrator to grant access.
- Employees added. Your people need to exist in General › Employees so you have an audience to send to. You can also import participants directly on the Audience step, but a well-maintained employee list makes targeting far easier.
- Channels connected (optional). If you plan to send over Slack, Microsoft Teams, SMS or WhatsApp rather than email, make sure that channel is set up for your account first. See Distribution channels overview.
Creating and launching surveys is a Survey Admin / Account Admin capability. Managers typically view results for their teams rather than build surveys. Exact permissions depend on how roles are configured for your account.
Step 1 - Basic settings
From the left menu, go to Listen › Surveys, then click Create a survey. You'll land on the Basic step, the first stop in the builder.
Here's what you'll set on this step:
- 1Name your survey - Give it a clear internal title (for example, "Q3 Engagement Survey"). This is how you'll recognize it in your survey list.
- 2Add a description - Optional context that sets up the survey for participants and explains why you're asking.
- 3Set a completion message - Customize the thank-you note people see when they finish, to close the loop warmly.
- 4Choose a background - Pick a preset background, or enable a custom background image, to set the tone of the survey-taking experience.
- 5Add your branding - Use your default logo, or upload a custom survey logo so the survey looks unmistakably like yours.
- 6Set the identity mode - Choose Anonymous or Non-anonymous. This is one of the most important decisions on the whole survey - see the anonymity section below.
- 7Configure eNPS - Toggle Add eNPS to this survey to include the "how likely are you to recommend…" question, decide whether it's mandatory, and place it at the Top or Bottom.
- 8Choose your drivers - Use CultureMonkey's default engagement drivers, or switch to custom drivers if your account defines its own.
There's also a test survey mode. Marking a survey as a test lets you trial the whole thing safely - and, importantly, test surveys can be deleted after launch, whereas normal launched surveys cannot. Use test mode while you're experimenting.
When you're happy, click Save & Continue to move to Questions.
When you switch a survey to anonymous, CultureMonkey raises the reporting threshold to protect respondents. If you later switch it back to non-anonymous, that higher threshold isn't automatically kept. Decide identity mode early and deliberately.
Step 2 - Questions
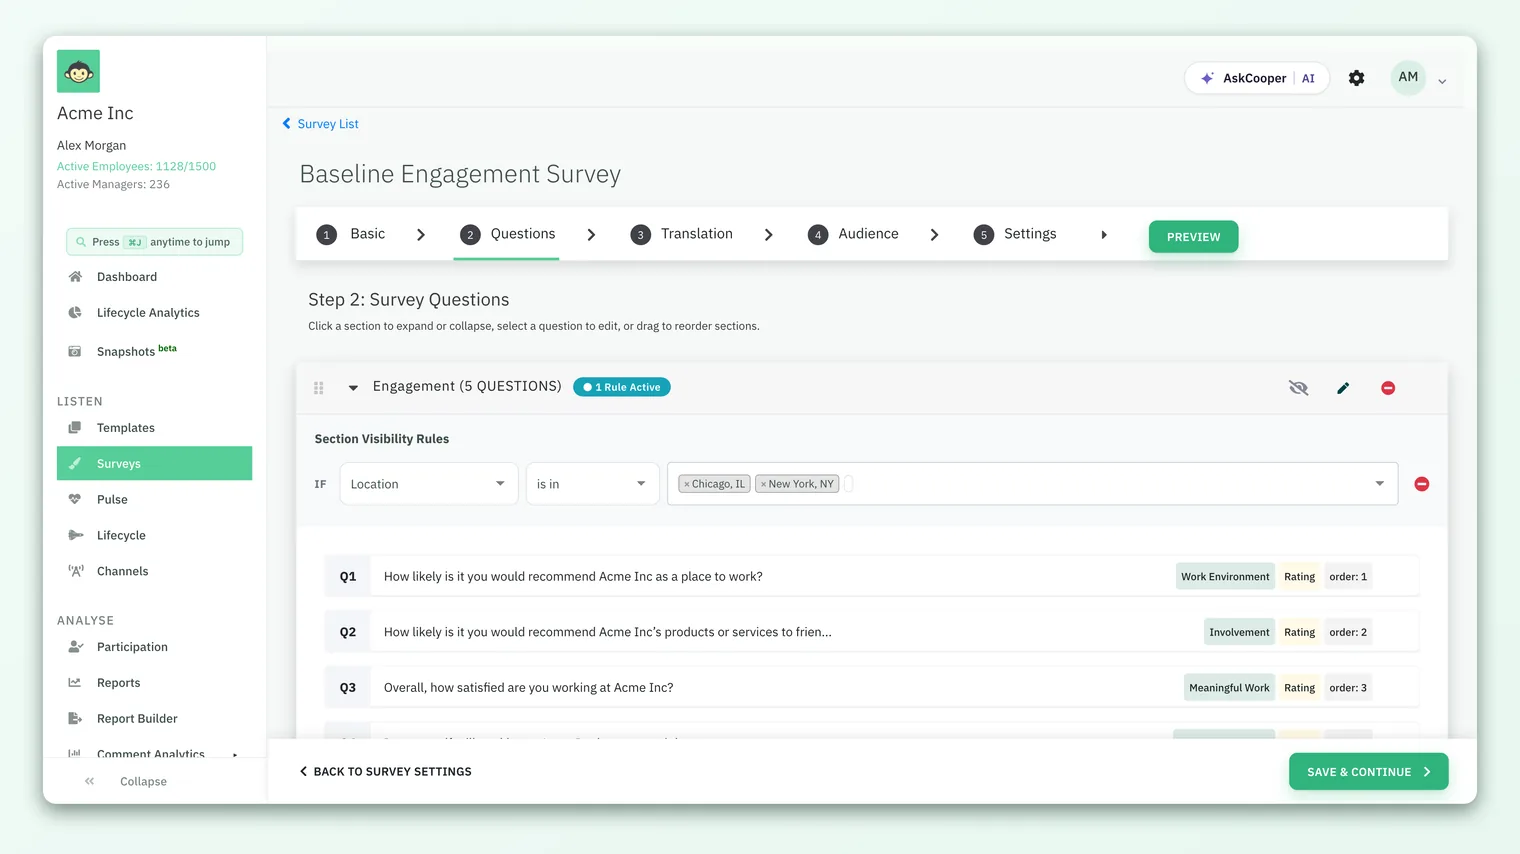
This is where the survey takes shape. You organize questions into sections and add questions of the type that fits what you want to learn. You can build every question by hand with Add custom question, or pull ready-made, research-backed questions with Add question from our library.
Sections and visibility rules
Sections group related questions so a long survey feels structured rather than endless. Give each section a heading, drag it to reorder, and - where supported - apply visibility rules so a section only appears for the people it's relevant to. Grouping also makes your reports easier to read, because results roll up by section and driver.
The question types
Pick the type that matches the kind of answer you need:
| Question type | Best for | Notes |
|---|---|---|
| Rating | Scale-based engagement questions - the backbone of most surveys | Uses a rating scale; you can choose the scale and how it's shown (e.g. a smiley view) |
| Single select | Choosing exactly one option from a list | You define the options |
| Multiple select | Choosing several options | You can cap choices with a selection limit |
| Free text | Open-ended, qualitative feedback | Great for "tell us more" and for context you can't anticipate |
| eNPS | The "how likely are you to recommend us as a place to work" question | Enabled at the survey level on Step 1, then placed Top or Bottom |
| Image | Questions that need a picture, or picture-based options | |
| Grid | Rating several items against the same scale in one block | Backed by a shared question set (one scale across rows) |
Most engagement surveys are built mainly from rating questions tied to drivers, with a few free text questions for color and an eNPS question for a headline number. Start there and add other types only where they earn their place.
Question library
Instead of writing everything from scratch, use Add question from our library to insert validated questions. Library questions come pre-mapped to drivers, which keeps your reporting consistent and comparable across surveys. It's the quickest way to build a rigorous survey - and you can still edit any library question after adding it.
Conditional and branching logic
You can make questions appear only when they're relevant using conditional questions. A trigger on one question decides whether a follow-up shows:
- By rating value - for example, if someone rates a question low, reveal a follow-up asking what went wrong.
- By option - for example, if someone selects a particular option, show a question specific to that choice.
Branching keeps surveys short for each person while still capturing depth where it matters. You control the order in which conditional follow-ups appear.
Comments, skip and "not applicable"
Each question can carry a couple of extra affordances:
- Comments - Turn on enable comments so respondents can add a free-text note alongside their answer, with an optional custom placeholder. This turns a rating into a rating plus the reason behind it.
- Skip / not applicable - Turn on the skip option so respondents can mark a question as not applicable rather than being forced to answer. You can customize the label (the default reads "Question not applicable").
Reordering, drivers, anonymity and languages
A few more controls shape the second step:
- Reordering - Drag questions and sections into the order you want; the builder tracks their sequence.
- Drivers / factors - Map each question to an engagement driver so results roll up into meaningful themes. Library and template questions are pre-mapped; assign drivers yourself when writing custom questions.
- Anonymity & response threshold - Your identity choice from Step 1 carries through here. The response threshold (the minimum number of responses before results are shown) protects individuals in small groups. Anonymous surveys use a floor of 3 responses by default; non-anonymous surveys use your account's configured minimum. See Set survey anonymity.
- Languages - If your account has multilingual surveys enabled, you can offer the survey in several languages and provide translations for each question, with an optional default language. A separate Translation step appears in the builder when this is on.
Whether a survey is anonymous or identified, and the response threshold that goes with it, are set as you build. Because these directly affect trust and reporting, confirm them before you launch - they can't be changed on a live survey.
Step 3 - Audience
Now choose who receives the survey. Click Add participants and build your list in whichever way suits:
- 1Select individual employees - Search by name, email, employee ID or phone and add people one at a time. Handy for small or targeted surveys.
- 2Target the whole organization or a group - Add everyone, or scope by business group, team, location or manager, so the right cohort gets the right survey.
- 3Import from CSV - Upload a participant list. Download the sample CSV first, fill it in, and CultureMonkey validates the file and flags any rows that need fixing before importing.
If you're a manager rather than a full admin, your selectable audience may be limited to the employees you're allowed to see. Once your list looks right, click Save & Continue to move to Settings.
Step 4 - Settings: channel, schedule and reminders
The final step decides how and when the survey reaches people.
Choose a distribution channel
Pick the channel invitations go out on. Email is always available; SMS, WhatsApp, Slack and Microsoft Teams appear if they're enabled for your account. For SMS and WhatsApp you can supply custom message content. If you'd rather not push notifications at all, some accounts can run a QR-only survey that people scan into. For a full comparison of when to use each channel, see Distribution channels overview.
Schedule the launch and the end
Decide the timing:
- 1Launch now or later - Choose Send immediately, or Send on a specific date and time. Times use your organization's timezone.
- 2Set an end date - Choose when the survey closes. A clear window creates healthy urgency and keeps your data tidy.
Set reminders
Non-responders are the difference between a mediocre response rate and a great one, so set up automatic reminders to nudge them before the survey closes. You can schedule reminders on a date and time, choose the channel for each, and even set recurring reminder patterns. You can also send a manual reminder at any point while the survey is running.
Preview and test before you launch
Never launch a survey you haven't taken yourself. Use Preview to walk through the survey exactly as a participant would - check the wording, the flow, any branching logic, the branding and the completion message.
If you want to trial the end-to-end experience, including notifications, mark the survey as a test survey back on Step 1. Because test surveys can be deleted afterward, they're the safe way to rehearse before the real thing.
Once a survey is live, several settings lock. On the way out, confirm your audience, your identity/anonymity setting, your channel and your end date. Fixing these before launch is far easier than working around them mid-flight.
Launch the survey
When everything checks out, click Publish this survey. If you chose Send immediately, invitations go out on your selected channel right away; if you scheduled it, CultureMonkey sends on the date and time you set. The survey's status moves from Draft to Published, then Running while it's open, and Ended once it closes.
What you can and can't edit on a live survey
CultureMonkey deliberately locks the core of a survey once it's out, so that the data you collect stays consistent and comparable for everyone who responds. In practice:
| Editable while live? | Details |
|---|---|
| Basic details (name, description, branding) | No - the Basic step is locked once the survey leaves Draft |
| Questions, sections, order | No - you can't add, remove or reorder questions on a running survey |
| Audience | No - the participant list is fixed at launch |
| Anonymity & response threshold | No - set before launch and can't be relaxed afterward |
| Reminders | Yes - you can still schedule or send reminders, including manual ones, while the survey runs |
| Ending the survey | Yes - you can close a running survey when you're ready |
The takeaway: treat launch as the point of no return for content and audience. This is exactly why the preview-and-test step matters.
A normal survey can't be deleted once it's been published, because doing so would destroy real responses. If you're just experimenting, mark it as a test survey first - those can be removed afterward.
Monitor participation after launch
Once the survey is live, open it from your survey list to watch it in real time. You'll see how many invitations went out on each channel and how participation is building. This is your cue for when to send reminders - a well-timed nudge to non-responders is the single most effective lever on your final response rate.
When enough responses arrive to clear the threshold, head to Analyse › Reports to explore results by driver, segment and eNPS. When something jumps out, turn it straight into an action plan.
Best practices
A few habits make for better surveys and better data:
- Keep it short. Shorter surveys get higher completion. Ask what you'll act on, and use branching so each person only sees what's relevant to them.
- Lean on the library. Library and template questions are validated and driver-mapped, which keeps results comparable across cycles. Reserve custom questions for the things templates can't cover.
- Decide anonymity deliberately. Anonymous surveys tend to get more candid feedback; identified surveys let you follow up. Choose intentionally and communicate it clearly.
- Always preview. Take the survey yourself - ideally as a test survey - before you send it to anyone.
- Set an end date and reminders. A clear window plus timely nudges beats an open-ended survey every time.
- Close the loop. Tell people what you heard and what you'll do. Nothing lifts future participation more than visibly acting on the last round.
Frequently asked questions
What's the difference between a survey title and a description?
The title is your internal name for finding the survey in your list. The description is participant-facing context that explains why you're asking. Keep the title practical (e.g. "Q3 Engagement") and the description warm and purposeful.
Can I change questions after the survey has launched?
No. CultureMonkey locks questions, sections, ordering, audience and anonymity once the survey leaves Draft status, so every respondent answers the same survey. Preview and test thoroughly before you publish.
How do I run the survey in more than one language?
If multilingual surveys are enabled for your account, a Translation step appears in the CultureMonkey builder where you provide translated question text per language, with an optional default. If you don't see it, multilingual isn't enabled for your account.
Do I have to send over email?
No. Email is always available, and SMS, WhatsApp, Slack and Microsoft Teams appear if they're set up for your account. Some accounts can also run a QR-only survey with no notifications. See Distribution channels overview.
Why can't I delete my survey?
Normal surveys can't be deleted once published, because that would destroy real responses. Only surveys marked as test surveys can be removed after launch - so use test mode while you're experimenting.
How do I improve my response rate?
Keep the survey short, pick the channel your people actually check, set a clear end date, and schedule reminders for non-responders. Following up on the previous survey's feedback is the biggest long-term lever.
Where to go next
- Prefer a head start? Browse and use survey templates
- Get anonymity right: Set survey anonymity
- Pick the best way to send: Distribution channels overview
- Turn results into change: Create an action plan
Your feedback helps us improve the Help Center.