

Brand your survey
How to make a CultureMonkey survey look like it came from your organization - the logo participants see, the background, and the welcome and thank-you messages - plus how account-level branding and per-survey overrides fit together.
On this page
A survey feels more trustworthy - and gets better responses - when it clearly comes from your organization rather than a generic tool. CultureMonkey lets you control the look and feel a respondent sees: the logo at the top of the survey, the background behind it, the welcome text that introduces it, and the thank-you message they read when they finish.
Related release: Custom Logo (March 4, 2026). See every dated change on Product Updates.
This guide explains every branding control, where each one lives, and - importantly - how account-level branding (set once for everyone) relates to per-survey overrides (set on a single survey). Get the account defaults right once, then reach for overrides only when a particular survey needs to look different.
Your organization logo is set once in account settings and appears on every survey by default. On an individual survey's Basic step you can override the logo, choose a background, write a description (the welcome text on the intro screen), and set a completion message (the thank-you text). If a survey has no override, CultureMonkey falls back to the business group logo, then the organization logo. Some branding controls are plan- or role-gated, so you may not see all of them.
What "branding" covers in CultureMonkey
Branding in CultureMonkey is about the respondent's experience - the two screens that book-end every survey and the frame around the questions in between:
- The intro (splash) screen - shows your logo, the survey title, and the description that welcomes people and explains why you're asking.
- The questions, sitting on your chosen background.
- The completion screen - shows your logo again, a thank-you heading, and your closing message.
Branding here means imagery and words, not a full theme editor. There's a logo, a background image, and two pieces of custom copy. There isn't a color picker or font control in the survey builder - the accent styling is handled by the product - so think of branding as "your logo, your background, your welcome, and your sign-off," applied consistently across the survey-taking journey.
Employees are wary of unfamiliar links, especially for anything that mentions anonymity. A survey that opens with your logo and a warm, specific welcome reassures people it's genuinely from their employer - which lifts both open rates and completion. Branding isn't decoration; it's trust.
Account-level branding vs per-survey overrides
CultureMonkey applies branding in layers, so you configure the common case once and only override when you need to.
| Layer | Where it's set | Applies to | Who sets it |
|---|---|---|---|
| Organization logo | Account settings (accounts/edit) | Every survey, by default | Account Admin |
| Business group logo | The business group's settings | Surveys taken by employees in that group, when no survey logo is set | Account Admin |
| Per-survey logo | A survey's Basic step | Just that one survey | Survey Admin |
| Background & messages | A survey's Basic step | Just that one survey | Survey Admin |
The logo is the clearest example of the layered model. When a participant opens a survey, CultureMonkey decides which logo to show in this order:
- The survey's own custom logo, if one was uploaded on that survey.
- Otherwise, the logo of the participant's business group, if their group has one.
- Otherwise, your organization logo.
So the survey-level upload is a true override: it wins for everyone taking that survey. If you leave it on Default, each participant sees the most specific logo that applies to them - their business group's logo if they have one, and your organization logo if not. This is why a "default" logo can legitimately look different for two people taking the same survey: they belong to different business groups.
The business-group layer exists for companies that operate several brands or entities under one CultureMonkey account. Each group can carry its own logo, so a single engagement survey can show the right brand to the right people automatically - without you creating separate surveys per brand.
Set your organization logo (account level)
Your organization logo is the foundation - it's what appears on surveys, emails, and the participant experience whenever nothing more specific is set. It's configured once, in account settings, not on each survey.
- 1Open account settings - Go to your account/organization settings page (the "Organisation Logo" upload lives there).
- 2Upload your logo - Choose an image file for the organization logo. This becomes the default across the product.
- 3Save - Once saved, every survey that doesn't override the logo will use it.
If no organization logo is uploaded, CultureMonkey shows its own default product logo, so surveys never appear "broken." But an unbranded survey misses the trust benefit above, so uploading your logo is one of the first things worth doing.
Uploading the organization logo is an Account Admin capability, and on many accounts the upload field only appears when custom logos are enabled for you. If you don't see it, ask an administrator to turn it on or upload the logo for you. Survey Admins can still override the logo on individual surveys (below).
There's also a separate control for emails: an account option lets you hide the logo in the email layout, if you'd rather your invitation and reminder emails not carry it. That's independent of what shows on the survey screens themselves.
Brand an individual survey (Basic step)
Everything else lives on Step 1 - Basic of the survey builder, alongside the survey's name and description. Go to Listen › Surveys, open or create a survey, and you'll find the branding controls under the title and description.
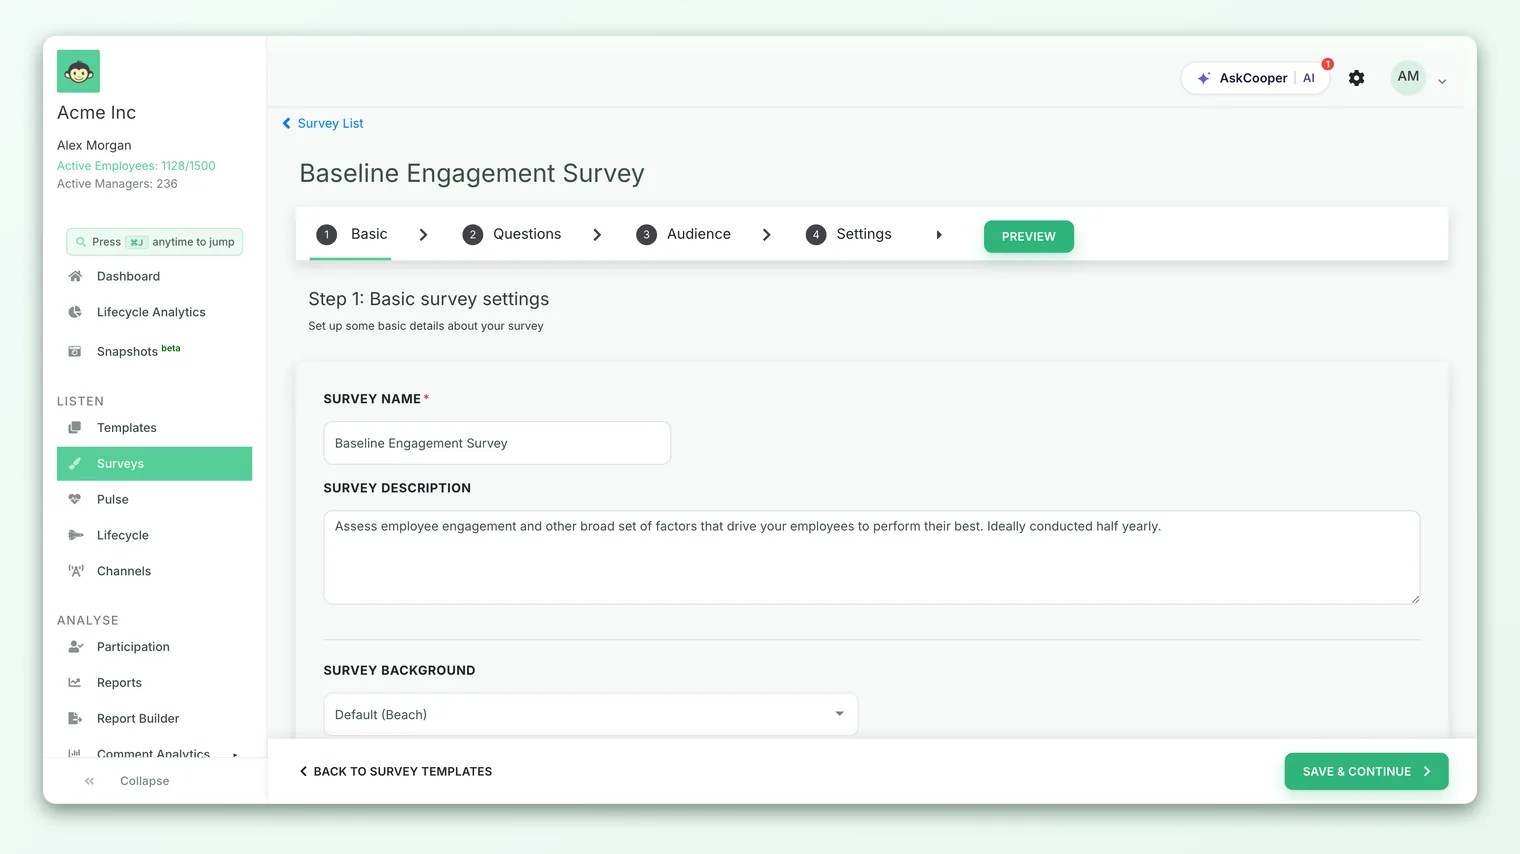
The controls that appear here depend on what's enabled for your account and your role, so you may see some and not others.
Override the survey logo
If custom survey logos are enabled for your account, you'll see a Survey Logo control with two options:
- Default - Use the layered fallback described above (business group logo if the participant has one, otherwise your organization logo). This is the right choice for most surveys.
- Custom - Upload a logo just for this survey. It then shows for everyone taking this survey, regardless of business group.
Uploads accept JPG, PNG or JPEG up to 2 MB. Reach for a custom survey logo when a specific survey belongs to a sub-brand, a campaign, or an event that has its own mark - for example a wellbeing initiative or an all-hands pulse - and you want it to look distinct from your standard engagement survey.
Use a clean logo on a transparent or light background so it sits well on the survey's intro screen. There's an account option to display the logo at its natural size rather than a fixed frame, which helps wide or unusually shaped logos render correctly.
Choose a background
The Survey Background sets the image behind the survey while people answer. You always get a set of built-in presets - Default (Beach) plus options like Blue, Latte Discussion, Spring Forest, Star Leaves, Tree Clouds and Wood Garlic - so you can set a tone without uploading anything.
On accounts where custom survey backgrounds are enabled, an admin can also upload a custom background image (recommended around 1440 × 1050, JPG/PNG/JPEG, up to 2 MB) for a fully bespoke look.
The option to upload your own background is limited - it appears only when custom backgrounds are enabled for the account and to higher-level admins. Everyone building surveys can still pick from the preset backgrounds.
Welcome message and completion message
Two short pieces of copy do a lot of the branding work, because they're the words people actually read.
The welcome text (survey description)
The description you write on the Basic step is what participants see on the intro screen, right under the survey title and your logo. In practice, this is your welcome message: it's the first thing people read, and it sets the tone. Use it to say who's asking, why it matters, roughly how long it'll take, and - if the survey is anonymous - to reassure people their answers are confidential.
There's no separate "welcome message" field; the description fills that role. (If your account uses a participant-facing survey label, that name is what shows to respondents in place of the internal title - handy when your internal name is something like "Q3 ENG FINAL v2.")
A line or two of warm, specific context beats a generic "Please complete this survey." Name the goal ("We want to make one real improvement to how we work this quarter") and the payoff ("We'll share what we heard and what we'll do"). That framing, wrapped in your logo, is your strongest branding.
The completion (thank-you) message
When someone finishes, they land on the completion screen - your logo again, a thank-you heading, and a closing line. If custom completion messages are enabled for your account, a Completion Message field appears on the Basic step where you can write your own closing note; whatever you enter shows on that final screen. If you leave it blank, or the feature isn't enabled, CultureMonkey shows a standard "response received" acknowledgement instead - so the screen is never empty.
This is the moment to close the loop in advance: thank people sincerely and tell them what happens next ("We'll review results as a leadership team and share actions within two weeks"). A specific promise here does more for future participation than a generic "Thank you for your time."
The custom Completion Message field only appears when it's enabled for your account. If you don't see it on the Basic step, participants will simply see the default thank-you acknowledgement.
Preview your branding before launch
Branding is visual, so don't trust it until you've seen it. Use Preview in the builder to walk through the survey exactly as a participant would - check that the logo is crisp and correctly sized, the background reads well behind the questions, the welcome text is warm and accurate, and the completion message says what you want it to.
Because logo fallbacks depend on the participant, it's worth previewing as (or checking with) someone in a business group if you rely on group logos, so you confirm the right mark appears. For a full end-to-end rehearsal including notifications, mark the survey as a test survey on the Basic step - see Create a survey from scratch for how test mode works.
Like the rest of the Basic step, your logo, background, description and completion message are fixed once the survey leaves Draft. You can't restyle a running survey, so preview and finalize branding before you publish.
Best practices
- Set the organization logo once, first. It becomes the sensible default everywhere, so most surveys need no logo work at all.
- Override sparingly. A per-survey logo is powerful precisely because it's the exception - reserve it for genuinely distinct campaigns or sub-brands.
- Match the message to the moment. A wellbeing survey and an exit survey deserve different welcome and thank-you copy, even if the logo is the same.
- Keep imagery light and legible. Clean logos and calm backgrounds keep the focus on the questions.
- Always preview. Sizing and contrast issues only show up when you actually look at the intro and completion screens.
- Use the thank-you to build trust. Promise what you'll do with the results - it's the cheapest, most effective lever on your next response rate.
Frequently asked questions
Where do I set my company logo so it shows on all surveys?
In your account/organization settings, using the Organisation Logo upload. It becomes the default logo across surveys and the participant experience. Individual surveys can still override it on their Basic step.
Why does the same survey show different logos to different people?
Because the logo is set to Default and those people are in different business groups. With no per-survey override, each participant sees their business group's logo if they have one, otherwise your organization logo. Upload a custom survey logo if you want everyone to see the same mark.
Can I change my survey's colors or fonts?
Survey branding in CultureMonkey is built around your logo, a background image, and your welcome and thank-you copy - there isn't a color or font editor in the survey builder. The product handles the accent styling so surveys stay consistent and legible.
Is there a separate "welcome message" field?
No. The survey description on the Basic step is what participants read on the intro screen, so it serves as your welcome message. Write it to introduce and reassure.
What happens if I don't write a completion message?
Participants see CultureMonkey's standard "response received" thank-you. Nothing breaks - you just miss the chance to close the loop in your own words. Note the custom Completion Message field only appears if it's enabled for your account.
Can I rebrand a survey after it's live?
No. Branding lives on the Basic step, which locks once the survey moves out of Draft. Set and preview your branding before you publish.
Where to go next
- Build the survey these settings sit on: Create a survey from scratch
- Start from a ready-made, driver-mapped survey: Browse and use survey templates
- Get the identity decision right: Set survey anonymity
Your feedback helps us improve the Help Center.