

Import candidates from a CSV in CultureMonkey
Upload a CSV of up to 10,000 candidates, map its columns, preview, import and fix any failed rows from the error file.
On this page
To import candidates into CultureMonkey from a CSV, open Candidates, click Create Candidate and choose Import Candidates from CSV. The importer walks you through three steps (1. Upload, 2. Map Attributes and 3. Preview) and then processes the file in the background. One file can hold up to 10,000 candidates and be up to 5 MB.
This guide covers preparing the file, each step of the importer, how rows are matched to existing candidates and jobs, and how to read the Import History and error file when something does not go through.
Save your file as a UTF-8 CSV with one row per candidate and dates as yyyy-mm-dd. Every row needs a first name, an email address and a job title, plus hiring manager and primary recruiter emails that belong to existing CultureMonkey employees. Pick Email Address or External ID as the anchor, map your columns, check the first 10 rows, and import. CultureMonkey updates candidates it already has and creates the rest.
Before you import
Three things make the difference between a clean import and an error file:
- Hiring managers and recruiters are employees. Primary Recruiter Email and Hiring Manager Email must be the email addresses of existing employees in CultureMonkey. A candidate record cannot be saved without both, so leave neither blank.
- Custom attributes exist. Create any candidate custom attribute before you import values for it. See Add custom attributes to candidate records.
- Jobs are set up. The importer links each row to a job by job title. If no job has that title, it creates one. Import your jobs first so titles match and each job keeps its real External ID. See Add jobs and import them from a CSV.
Prepare the file
Start from the template: on the Upload step, click Download Sample Candidate CSV Template. It contains every standard column plus one column per candidate custom attribute, named cf_ followed by the attribute's key. Replace the sample rows with your own data; they are placeholders.
| Column | What it holds | Required? |
|---|---|---|
first_name | Candidate's first name | Yes |
email_address | Candidate's email address | Yes |
job_title | Title of the job the candidate is linked to | Yes |
hiring_manager_email, primary_recruiter_email | Emails of existing employees | Needed for the row to save |
external_id | The candidate's ID in your ATS | Required if you anchor on External ID |
last_name, phone_number, gender, candidate_id | Identity details. Include the country code on phone numbers | No |
primary_recruiters_manager_email | Recruiter manager's email | No |
location | Location name. New names are created as locations | No |
current_status | Where the candidate is in hiring, for example Applied or Hired | No, but lifecycle stages often depend on it |
date_of_hire, date_of_joining | Dates as yyyy-mm-dd | No |
is_active | true or false | No |
cf_<key> | One column per custom attribute | No |
Other file rules: the file must be a .csv, encoded as UTF-8, no larger than 5 MB, with no more than 10,000 data rows and no blank rows. The importer checks these as soon as you choose the file and shows Limit exceeded ! if there are too many rows.
Step 1: Upload the file
Drag the file onto the upload box, or click click here to browse. The counter under Upload File shows how many candidates the file holds out of the 10,000 allowed. The right-hand panel, Import Your Candidates with Ease!, summarizes the steps. Click Next when the file is accepted.
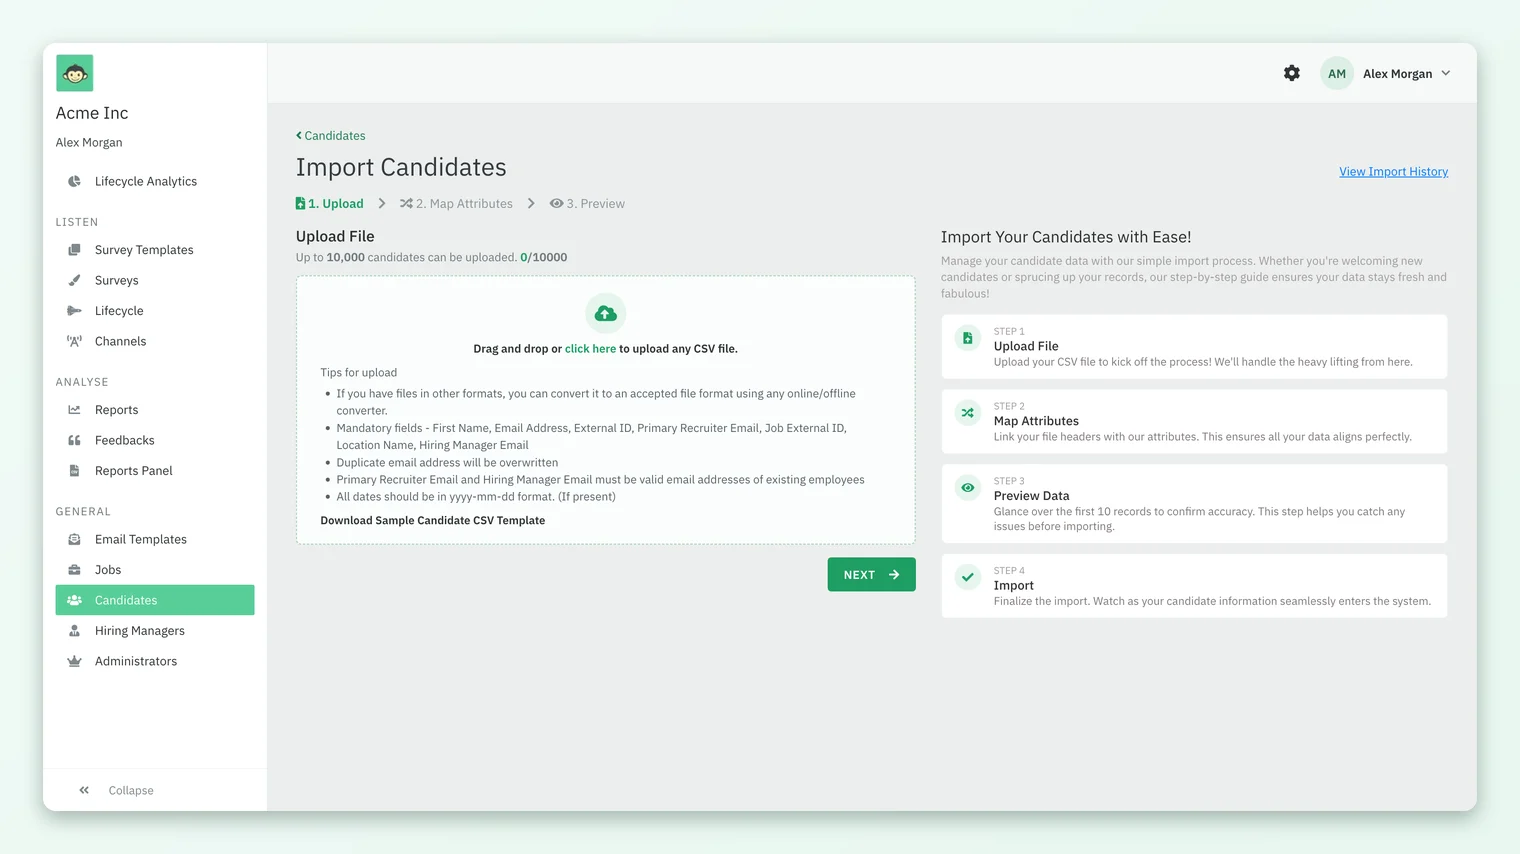
The Tips for upload list names seven mandatory fields. The importer itself only requires First Name, Email Address and Job Title to be mapped; a row then also needs a valid hiring manager and primary recruiter to save. The tip's other points hold: dates in yyyy-mm-dd, and recruiter and hiring manager emails that belong to existing employees.
Step 2: Map Attributes
On Attribute Mapping you tell CultureMonkey which column in your file holds which candidate field.
- 1Under Anchor Field, choose Email Address or External ID. This is the field used to recognize candidates you already have, so its values must be unique and never blank.
- 2In File Header, pick the column in your file that holds the anchor, then click Validate. The importer rejects blank or duplicate anchor values at this point.
- 3Map the remaining fields. Core Attributes holds First Name, Last Name, Gender, Email Address, Job Title and Candidate ID; the three marked with an asterisk are mandatory.
- 4Open Supplemental Attributes to map Phone Number, the recruiter and hiring manager emails, Location, Current Status, the two dates, Is Active and External ID.
- 5Open Custom Attributes to map each of your
cf_columns, then click Validate and Next. If a mandatory field is unmapped you will see *Please map the mandatory attributes.
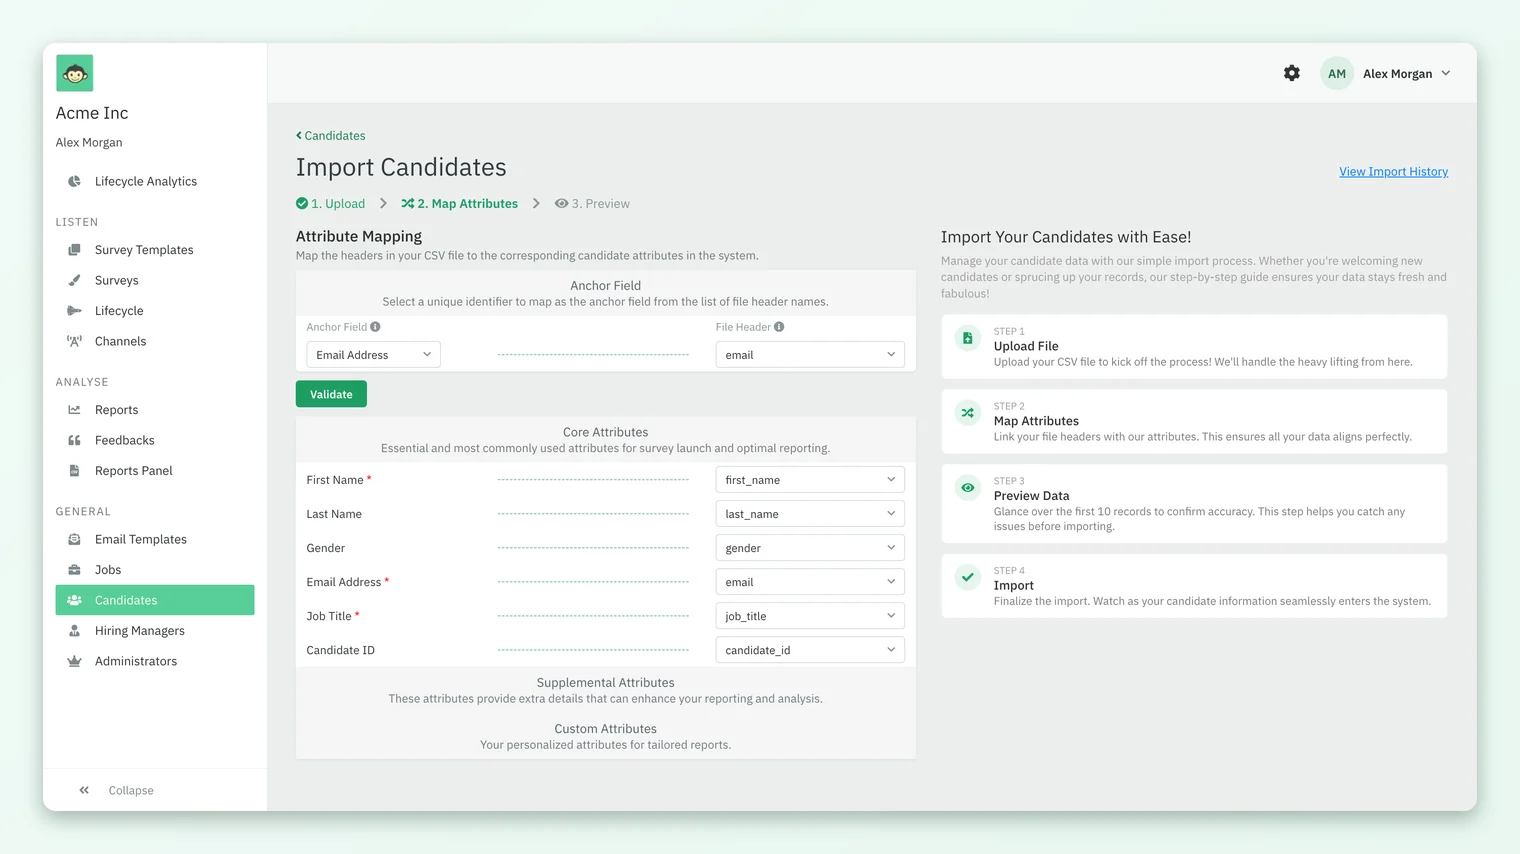
CultureMonkey remembers your mapping for the account, so the next import with the same column names starts pre-filled.
Step 3: Preview and import
Preview Data shows the first 10 records as they will be imported. Check that names, emails and dates landed in the right columns. Use Back to fix the mapping, or click IMPORT to start. The import runs in the background, so you can leave the page while it processes.
How rows are matched
| Record | How the importer finds it | If not found |
|---|---|---|
| Candidate | By the anchor you chose, ignoring case. If you anchor on External ID and there is no match, it tries the email address | A new candidate is created |
| Job | By job title, ignoring case | A new job is created with that title |
| Location | By name | A new location is created |
| Custom attribute column | By its cf_ key | The row is flagged with "Master attribute ... not found. Please create the custom attribute first." The rest of the row is still saved |
Because existing candidates are updated rather than duplicated, you can re-import a corrected file safely.
If you import with Email Address as the anchor and later switch to External ID, make sure every existing candidate has an External ID first. Otherwise candidates can be matched by email the first time and by ID afterwards, which is harder to audit.
Check the result in Import History
Click View Import History at the top of the importer. The table lists every upload with File Name, Uploaded At, Uploaded By, Status, Error File, Total, Success and Error.
- Processing: the file is still being worked through. Larger files take a few extra minutes.
- Completed: every row was imported.
- Error: at least one row failed. The rest of the file was still imported; the Success and Error counts show the split.
When there are failures, the Error File column links to a CSV of the failed rows. Each row starts with a status and an error_msg column explaining the problem, followed by the data you sent. Fix those rows, delete the two extra columns, and import the corrected file.
Frequently asked questions
How many candidates can one CSV import hold?
Up to 10,000 candidates in a file of up to 5 MB. For larger pipelines, split the file and import each part; rows are matched to existing candidates, so the order does not matter.
Why does Import History say Error when most rows imported?
Any failed row marks the whole upload as Error. Check the Success and Error counts, then download the error file to see which rows failed and why.
Can I update existing candidates with a CSV?
Yes. CultureMonkey matches each row to an existing candidate by the anchor field (Email Address or External ID) and updates it. Rows with no match become new candidates.
What happens if a hiring manager is not an employee in CultureMonkey?
The row cannot be saved, because every candidate needs a hiring manager and primary recruiter who exist as employees. Add the person as an employee first, then re-import the row.
Does the CSV import create jobs?
Yes, when no existing job has the title in the row. To keep job details and External IDs accurate, add or import jobs before you import candidates.
Can I set a candidate's survey language in the CSV?
No. The language preference is not a CSV column. It can be sent through the API, and candidates can pick a language on the survey start page where your account offers that.
Where to go next
- Set up jobs first: Add jobs and import them from a CSV
- Create attribute columns: Add custom attributes to candidate records
- Automate instead: Send candidates to CultureMonkey with the API
- Understand the options: How candidate data gets into CultureMonkey
- On the website: Candidate experience ATS integration
Your feedback helps us improve the Help Center.