

Set a survey's basic details
A deep dive into the first step of the survey builder - the survey name, participant label, description, completion message, branding, identity, and question settings that shape every survey before you add a single question.
On this page
- Where the Basic step lives
- Survey name
- Survey label (participant-facing)
- Description
- Completion message
- Branding: logo and background
- Test survey mode
- Identity settings
- QR-only survey
- Question settings
- Driver settings
- What about dates and scheduling?
- Saving and moving on
- Best practices
- Frequently asked questions
- Where to go next
Every survey in CultureMonkey opens on the same first screen: the Basic step. Before you write a single question or pick a single recipient, this step is where you name the survey, decide what participants see, brand it, and set a handful of defaults that quietly shape the whole experience - including whether it's anonymous and whether it carries an eNPS question.
This guide is a close look at that one step. It walks through every field in the order it appears, tells you which are required and which are optional, and explains how each choice affects the survey you're about to build. If you want the whole four-step flow instead - Basic, Questions, Audience, Settings - start with Create a survey from scratch.
The Basic step of the CultureMonkey survey builder sets a survey's identity: a required survey name (2-255 characters), an optional participant-facing label, a description and completion message, your logo and background, whether the survey is anonymous, whether it's QR-only, and its question settings - eNPS, feedback comments and drivers. Only the name is mandatory. Click Save & Continue to move on. Most of these lock once the survey goes live.
Where the Basic step lives
From the left menu, open Listen › Surveys and click Create a survey (or open an existing draft and choose to edit it). Whether you started from a blank survey or a template, you land on Step 1: Basic survey settings, described in the app as "Set up some basic details about your survey."
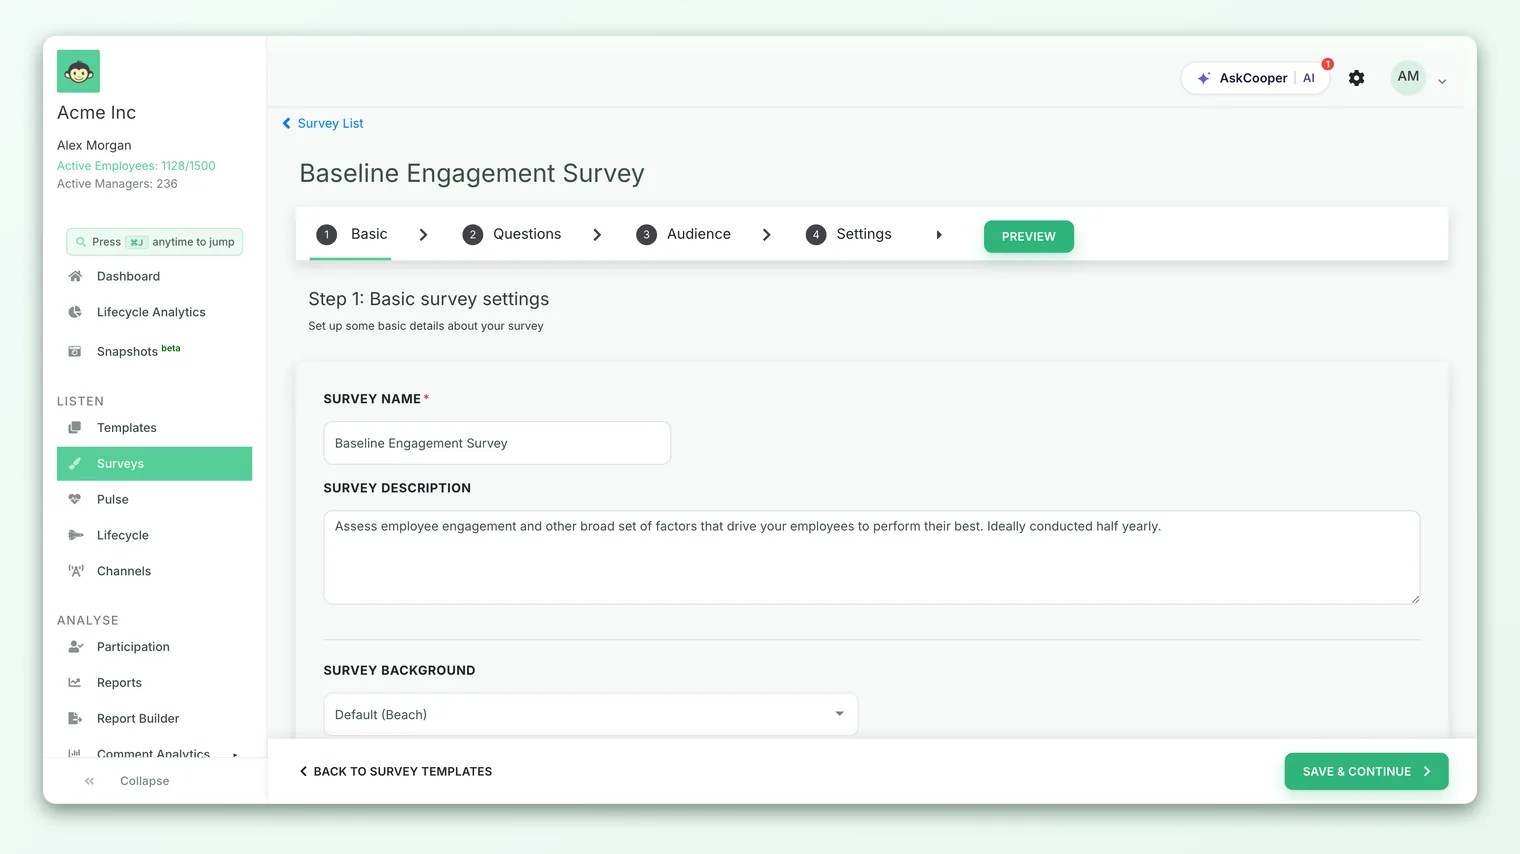
The step is a single scrolling form. The sections below follow it top to bottom. Some fields only appear when the matching feature is enabled for your account - those are called out as you reach them.
Survey name
The Survey Name (labelled Survey Name in the app, stored as the survey's title) is the one field you can't skip. It's your internal name for the survey - how you'll recognize it in your survey list, your reports and your notifications later on.
A few rules apply:
- It's required, and must be between 2 and 255 characters. Save is blocked until it's valid.
- It can't contain these characters:
/ \ ? % * : | " < > =. The field enforces this as you type, because these characters can break file names and links downstream. - It's pre-filled with a sensible default -
Custom Surveyfollowed by today's date (for example, Custom Survey 08 Jul 26) - so a survey always has a name even if you forget to set one. Replace it with something meaningful.
Use a name that will still make sense months later, when it's one of dozens in your list - for example "Q3 2026 Engagement" or "New Hire - 30 Day Check-in." A dated, purposeful name saves you from a list of near-identical "Custom Survey" entries.
Survey label (participant-facing)
By default, the name you just set is what participants see. But if your account has the survey display name feature enabled, a second field appears directly under the name: Survey label (Participant-Facing).
This lets you separate your internal name from the external one. You might track a survey internally as "Q3 Eng - pilot cohort" while participants simply see "Your Voice at [Company]." The label is:
- Optional - leave it blank and participants see the survey name instead.
- Length-limited to 2-255 characters when you do fill it in.
If you don't see this field, the feature isn't enabled for your account, and the survey name is what everyone sees.
Description
The Survey Description is an optional free-text area that gives participants context before they begin - why you're running the survey, what you'll do with the results, and how long it should take. A warm, specific description sets the tone and can lift completion rates, because people answer more openly when they understand the purpose.
It's genuinely optional: you can launch a survey with no description at all. But a sentence or two of "here's why we're asking, and here's our commitment to act on it" is usually worth the effort.
The name is your practical internal handle ("Q3 Engagement"). The description is the participant-facing intro that explains the why. Keep the first short and searchable; make the second warm and purposeful.
Completion message
If your account has custom completion messages enabled, a Completion Message text area appears next. This is the note people see on the final "thank you" screen when they finish the survey - your chance to close the loop warmly, thank them for their time, and reassure them their feedback matters.
Like the description, it's optional. If the field isn't visible or you leave it blank, participants see the standard completion screen.
Branding: logo and background
Below a divider, the branding controls let the survey look unmistakably like yours. Both are optional and both fall back to sensible defaults.
Survey logo
Where the custom logo feature is enabled, you'll see a Survey Logo dropdown with two choices:
- Default - uses your organization's logo (and, on accounts with business-group access, the taker's business-group logo if one is set, falling back to the organization logo).
- Custom - reveals a drag-and-drop uploader so you can set one logo shown to everyone in this survey. It accepts JPG, PNG or JPEG up to 2 MB.
Survey background
The Survey Background control lets you pick a preset background image - or, where custom backgrounds are allowed, upload your own - to shape the survey-taking experience. The uploader recommends roughly 1440 × 1050 and again accepts JPG/PNG/JPEG up to 2 MB. As the help text puts it, these are "different background images for this survey to control the survey taking experience for your employees."
Neither logo nor background changes what the survey asks - they're purely about how it feels to take.
Test survey mode
For accounts and users with the right access, a Survey Mode section lets you Mark as test survey. This matters for one big reason spelled out right in the form: surveys not marked as test surveys cannot be deleted.
A test survey lets you rehearse the entire end-to-end experience - including notifications - and then delete it afterward. A normal launched survey can't be removed, because doing so would destroy real responses. So while you're experimenting, mark it as a test; when you're building the real thing, leave it unchecked.
Identity settings
Next comes one of the most consequential choices on the whole survey: Identity Settings. Two radio buttons:
- Anonymous - as the form says, "no employee data will be revealed." Individual responses can't be traced back to a person.
- Non-anonymous - admins can view individual employee responses.
This single choice ripples through the rest of the survey. When you pick Anonymous, CultureMonkey automatically raises the minimum number of responses required before results are shown, so no individual can be identified in a small group. That minimum - the response threshold - is set to a floor of 3 for anonymous surveys, versus your account's configured minimum for non-anonymous ones.
Because identity and threshold are so important - and because they're closely linked - they each have their own guide. Set identity here, but read the details there:
- Set survey anonymity - how anonymous vs. non-anonymous changes what admins and managers can see, and why it's hard to relax once set.
- Set the response threshold - the minimum-response floor that protects individuals in small groups, and how it's derived from your identity choice.
Switching a survey to anonymous raises its reporting threshold to protect respondents. Switching back doesn't automatically restore the lower one, and identity can't be changed at all once the survey is live. Get this right on the Basic step, before you launch.
QR-only survey
Unless the survey is part of a lifecycle or autopilot flow, you'll see a QR-only Survey toggle. Check it and CultureMonkey sends no notifications or reminders - instead, "participants can access via direct link or QR code."
This suits situations where you can't (or don't want to) email people: a break-room poster, a badge-scan station, a deskless workforce reached through a printed code. Leave it unchecked and the survey uses the normal notification and reminder flow you configure on the Settings step. Because a QR-only survey skips reminders entirely, response rate depends on how visibly you place the code.
Question settings
The Question Settings block sets survey-wide defaults that affect your questions, even though you haven't written any yet.
Add eNPS
Check Add eNPS to this survey to include the standard "how likely are you to recommend this organization as a place to work?" question - the source of your Employee Net Promoter Score. When it's on, a placement control appears:
- Placement of the NPS questions - choose Top or Bottom to decide whether the eNPS question opens or closes the survey.
Some accounts also expose a custom eNPS option here for tailoring the question wording. If you want the full background on the metric itself, see What is eNPS and how is it calculated?.
Disable feedback
The Disable feedback checkbox turns off the free-text feedback affordance for the survey. Leave it unchecked (the default) if you want participants to be able to add comments; check it for a purely quantitative survey where open text isn't wanted.
Languages
If multilingual surveys are enabled for your account, a language control appears in this block too, letting you offer the survey in more than one language. A dedicated Translation step then appears later in the builder for the actual translations.
Driver settings
Finally, Driver Settings decides which framework your questions map to for reporting:
- Default - CultureMonkey's built-in engagement drivers. Recommended, because default drivers keep your results comparable across surveys and benchmarks.
- Custom - your account's own drivers, if any have been defined.
Two constraints the form makes explicit: you can't mix default and custom drivers in one survey, and once a survey already has questions, this choice locks (the radio buttons disable) so you can't pull the framework out from under existing questions. The app's own advice: "We recommend using default drivers for better analysis."
What about dates and scheduling?
A common point of confusion: the Basic step has no launch date, end date or scheduling fields. Those live on the final Settings step, where you choose when the survey goes out, when it closes, and what reminders to send. The Basic step is about what the survey is; Settings is about when and how it reaches people. See the scheduling section of Create a survey from scratch.
Saving and moving on
When the Basic step looks right, click Save & Continue at the bottom to move to Step 2: Questions. Your survey is saved as a Draft - nothing is sent to anyone yet, and you can come back and edit the Basic step freely until you publish.
Once a survey leaves Draft - that is, once it's published - the Basic step is locked. Name, description, branding, identity and question settings are all fixed for the life of the survey, so every respondent answers the same thing. Confirm them before you publish; there's no editing them mid-flight.
Best practices
- Give it a real name. Replace the auto-generated "Custom Survey" default with something dated and descriptive you'll recognize later.
- Write a short description. Two sentences on why you're asking and what you'll do with the answers earns more candid responses.
- Decide identity first, not last. Anonymity shapes trust and the reporting threshold, and it can't be relaxed on a live survey - so choose it deliberately here.
- Prefer default drivers. Unless your account has a deliberate custom framework, default drivers keep results comparable across cycles.
- Use test mode while experimenting. Only test surveys can be deleted after launch, so mark rehearsal runs as tests.
Frequently asked questions
Is the survey name shown to participants?
By default, yes - the name is what people see. If your account has the participant-facing Survey label enabled, you can set a separate external name and keep the survey name purely internal.
Which fields on the Basic step are required?
Only the survey name (2-255 characters, no special characters like / \ ? % * :). Description, completion message, label, logo and background are all optional, with sensible defaults.
Can I add launch and end dates here?
No. Scheduling - when the survey opens, when it closes, and reminders - is on the final Settings step, not the Basic step. The Basic step defines the survey's identity and content settings only.
Why can't I change the driver type?
CultureMonkey locks the Default / Custom driver choice once a survey already has questions, because switching frameworks would break the mapping of existing questions. You also can't mix the two in one survey. Set it before you build questions.
Can I edit the Basic step after launch?
No. CultureMonkey locks the Basic step once the survey is published, so name, branding, identity and question settings stay consistent for every respondent. Review them carefully before you publish - and use a test survey if you want to rehearse.
Where to go next
- See the whole flow: Create a survey from scratch
- Get identity right: Set survey anonymity
- Understand the reporting floor: Set the response threshold
- On the eNPS question: What is eNPS and how is it calculated?
Your feedback helps us improve the Help Center.