

Your first 30 days as an admin
A week-by-week rollout plan for a new CultureMonkey admin - set up your account and people in week one, build a survey in week two, launch and drive participation in week three, and analyse and act in week four.
On this page
Welcome to CultureMonkey. You've been handed the keys to your organization's employee-engagement platform, and there's a lot you could do on day one. The trick is knowing what to do first.
This guide lays out a paced, four-week rollout so nothing important gets skipped and nothing runs ahead of itself. Each week builds on the last: you'll get your account and people set up before you build a survey, build the survey before you launch it, and launch it before you dig into results and act. Follow it in order and by the end of your first month you'll have run a real survey, read the results, and started closing the loop with employees - the full cycle, done properly once.
Spend week 1 getting your CultureMonkey foundation right - account settings, employees, org structure and roles. Week 2 is for building your first survey. Week 3 is launch and participation. Week 4 is analysis and action. Don't rush ahead: a survey built on a messy employee list produces messy results.
How to use this plan
Each week below is a ## section with a short checklist. Treat the checklists as a tracker - work through them top to bottom, and lean on the linked how-to articles whenever you need the detailed steps. You don't have to spend a literal calendar week on each phase; the sequence matters more than the timing. A small, focused organization might compress the whole thing into a fortnight, while a large enterprise with an HRIS integration and thousands of employees may want the full month. Either way, resist the temptation to jump straight to "build a survey" before your people data is clean - that's the single most common cause of confusing results later.
Throughout, you'll be working in the left-hand navigation, which groups everything into Listen, Analyse, Act, General and Settings. Getting comfortable with that structure now will pay off all month.
Week 1 - Set the foundation
This week is entirely about setup. It isn't glamorous, but it's the work that makes every later step trustworthy. Get your account details, your people, and your org structure right, and the surveys, reports and segments in weeks two through four will simply work.
Configure account settings
Start in Settings › General (the account edit screen). This is where your organization's identity and a few important defaults live.
- 1Set your company name and logo - these appear to employees on survey invitations and the survey-taking experience, so they should look right from day one.
- 2Set your timezone - this is important. Survey launch times, reminder times and end dates are all interpreted in your account timezone, so getting it right now prevents a survey going out at 3 a.m.
- 3Review the anonymity threshold - the minimum number of responses required before results are shown for a group. The default is a sensible starting point; lowering it too far can compromise anonymity, so change it deliberately.
The response threshold exists so no individual's answer can be inferred from a small group. Employees are far more candid when they trust that promise. Set it once, thoughtfully, and leave it alone. If results ever look empty, it's usually the threshold doing its job - see Why can't I see results yet?.
Add your employees
You can't survey people you haven't added. Head to General › Employees. There are three ways to build your list, and the right one depends on your size and tooling:
| Method | Best for | Where |
|---|---|---|
| Add manually | A handful of people, or quick fixes | Employees › Add |
| Import from CSV | Most first-time rollouts | Employees › Import |
| Sync from your HRIS | Ongoing, hands-off accuracy | Integrations |
For a first rollout, a CSV import is almost always the fastest path. CultureMonkey gives you a sample template to download, then walks you through mapping your columns to fields, previewing the result, and confirming the import - with an import history you can refer back to. The full walkthrough, including how to fix common mapping errors, is in Import employees from a CSV.
If your organization runs an HRIS such as BambooHR, Workday, Darwinbox or Keka, consider setting up that sync instead so your employee list stays current automatically. It's more effort up front but saves you manual maintenance every month.
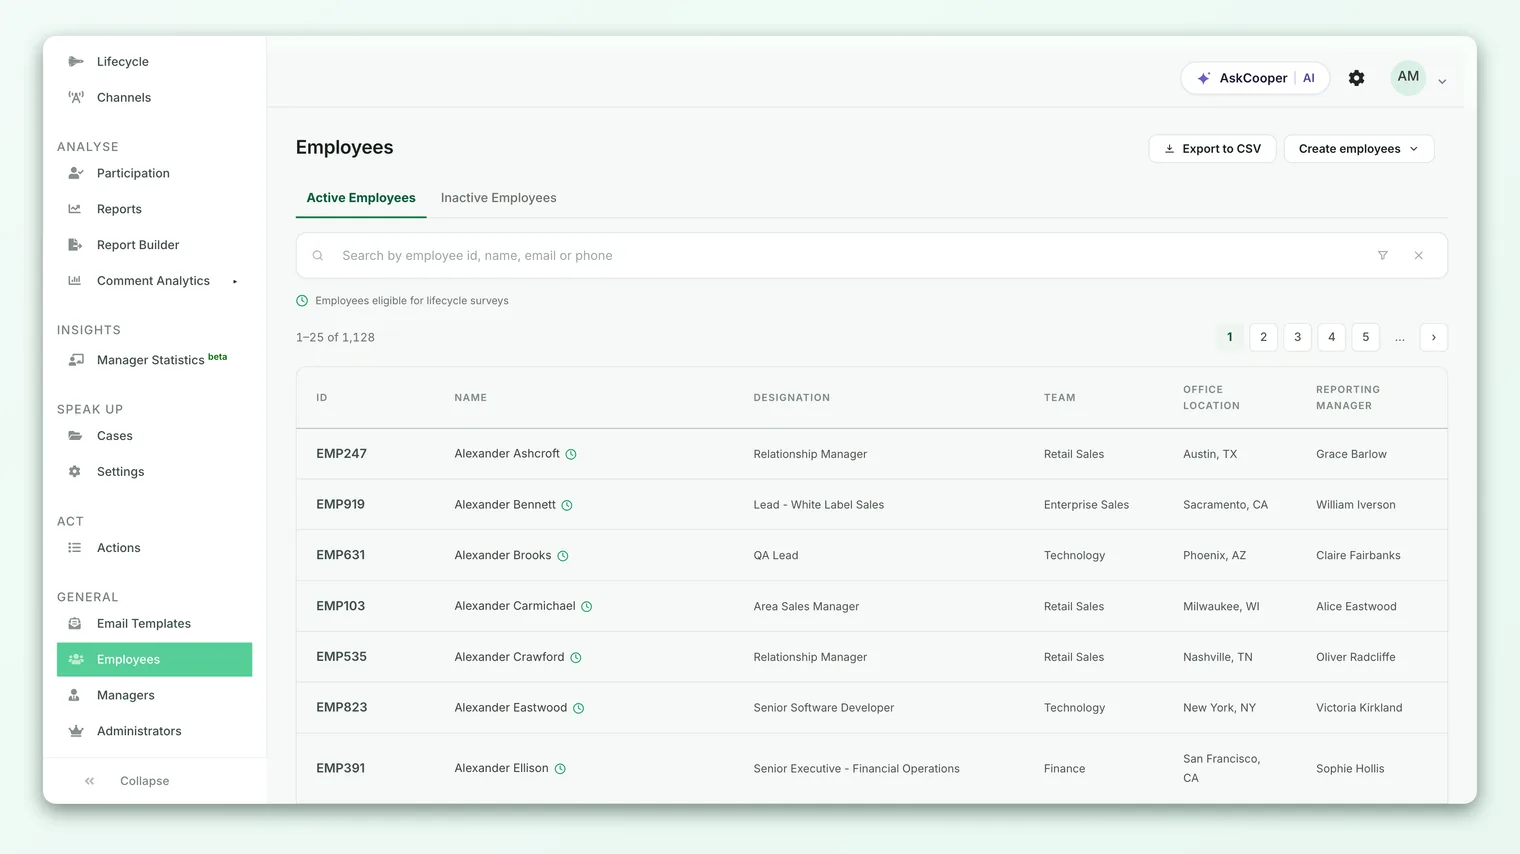
The quality of your employee data decides the quality of your reports. Missing managers, blank teams or inconsistent location names all show up later as gaps and "unassigned" buckets in your dashboards. Spend the time here to get it right - it's much harder to fix once a survey is live.
Set up your org hierarchy
Once people are in, give them structure. Under Settings › Demographics you'll configure the groupings CultureMonkey uses to slice results:
- 1Teams and Sub Teams - the primary way most organizations segment engagement. Set these up to mirror how your business actually thinks about itself.
- 2Locations - geographic grouping, with an optional country / state / city hierarchy for larger, distributed organizations.
- 3Business Units - a higher-level segment if you operate across distinct divisions.
- 4Custom Attributes - anything else you want to slice by (tenure band, employment type, function) that isn't a standard field. Define the attribute once, then it becomes available as a filter everywhere.
The goal is simple: every meaningful cut you'll want to see in a report later - "how does the Chennai sales team feel?" - should map to a team, location or attribute you set up here.
Invite admins and managers, and set roles
You shouldn't run engagement alone. Under General › Administrators, invite the colleagues who'll help you run the program. When you add an admin, they receive an email invitation to confirm and set up their access.
CultureMonkey distinguishes a few roles:
| Role | What they can do |
|---|---|
| Account Admin (super admin) | Full access - settings, all surveys, all reports. This is you. |
| Sub admin | Scoped access, limited to assigned teams, locations or business units. |
| Manager | Sees results for their own team, subject to the anonymity threshold. |
When you add a sub admin you can also set their survey access - all surveys, custom engagement surveys only, or lifecycle surveys only - so people see exactly the scope they need and nothing more.
Managers are handled under General › Managers. Giving managers visibility into their own team's results (once enough responses come in) is one of the most powerful things you can do - it turns engagement from an HR report into a shared responsibility. Set this up now so it's ready when your first results land in week four.
Engagement programs succeed or fail on manager buy-in. Adding managers and briefing them before your first survey means that when results arrive, they already know what to expect and how to read their team view. Don't leave this to the last minute.
Week 2 - Build your first survey
With your foundation in place, you're ready to create something to send. Work in Listen, and don't feel you have to invent everything from scratch.
Pick a template or build custom
You have two starting points, both under Listen:
- Templates - open Listen › Templates to browse research-backed survey blueprints. Pick one that matches what you want to learn (engagement, onboarding, a specific driver), and customize it. This is the recommended path for a first survey - you get a proven question set without staring at a blank page.
- Custom - open Listen › Surveys › Create survey to build from scratch when you want full control.
Either way you'll move through the same builder: Basic → Questions → Audience, with settings for anonymity and channels. The complete walkthrough lives in Create a survey from scratch - the steps are identical whether you started from a template or a blank survey.
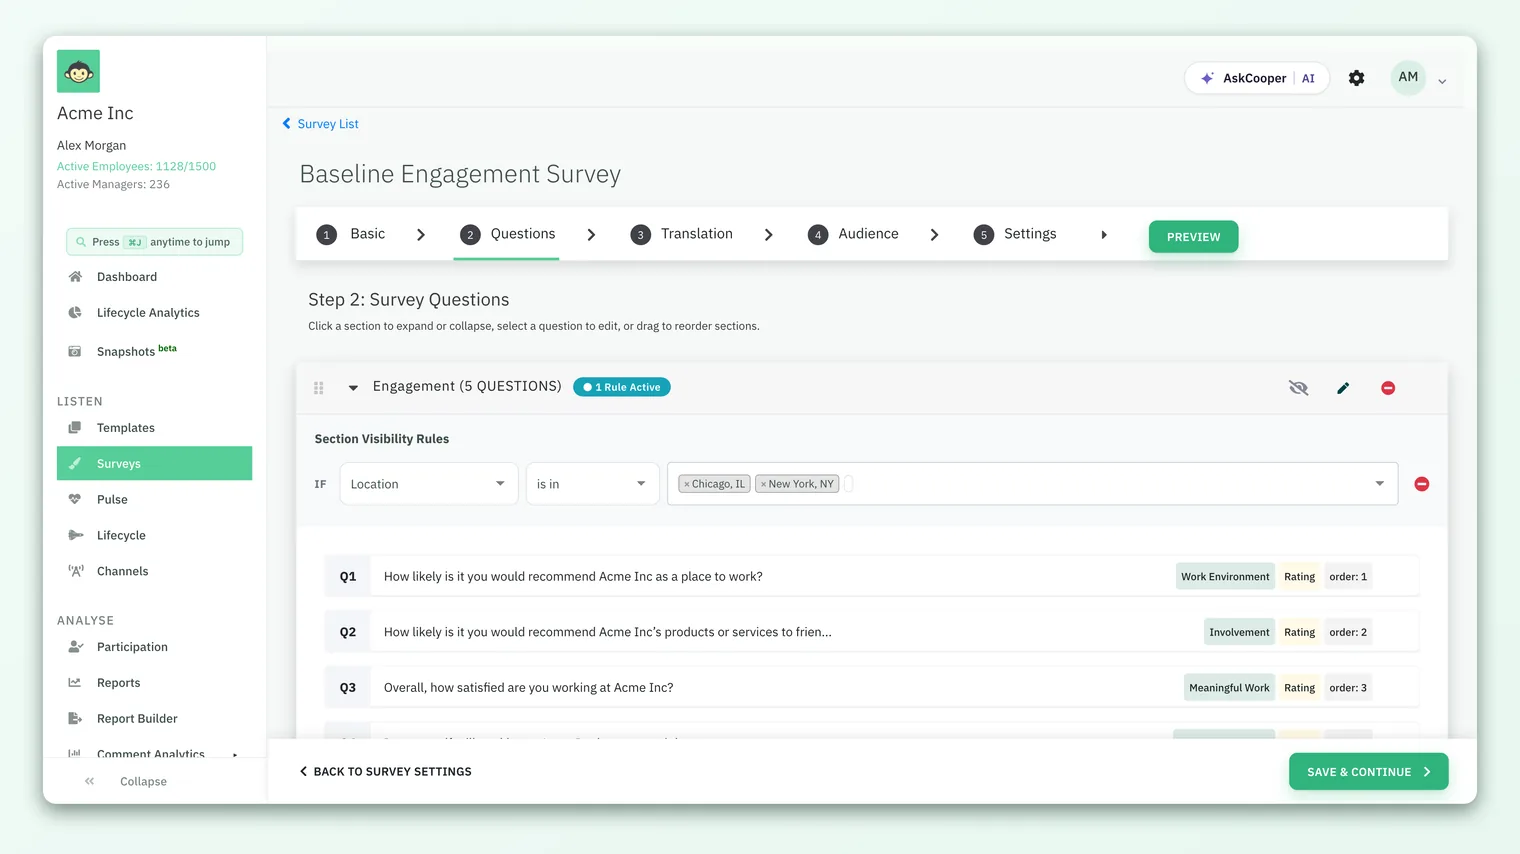
Choose your questions
Keep your first survey focused. It's tempting to ask everything, but a shorter survey gets higher completion and clearer signal. In the Questions step you can add:
| Question type | Use it for |
|---|---|
| Rating | Scale-based engagement questions - the backbone of most surveys |
| eNPS | The "how likely are you to recommend us as a place to work?" question |
| Single / multiple select | Choosing one or several options |
| Free text | Open-ended, qualitative feedback |
For a first engagement survey, a solid mix is a handful of rating questions across the drivers you care about, one eNPS question, and one free-text question for open comments. Organize related questions into sections so the survey reads logically.
If you include the recommendation question, it's worth understanding how the score is built and read. See What is eNPS and how is it calculated?.
Set anonymity
Decide whether the survey is anonymous or identified, and confirm the response threshold - the minimum number of responses before results are revealed for any group. For a first engagement survey, anonymous is almost always the right call: it produces the most honest feedback. This is set within the survey's settings and works alongside your account-level threshold.
Choose your channels
Finally, decide how people will receive the survey. CultureMonkey can reach employees over email, SMS, WhatsApp, Slack and Microsoft Teams. Email is the default and the simplest place to start; if your workforce lives in Slack or Teams, those channels typically drive stronger participation because the survey meets people where they already are. You don't have to pick just one - you can combine channels to reach frontline and desk-based staff alike.
Week 3 - Launch and drive participation
Your survey is built. This week is about getting it out and getting people to respond - participation is what turns a survey into data you can trust.
Schedule the launch
Before you launch, preview the survey as a participant to check the flow and wording - this catches typos and confusing questions while they're still easy to fix. Then set your timing:
- 1Choose a launch time - send immediately, or schedule a start date and time. Mid-morning midweek generally beats Monday mornings and Friday afternoons.
- 2Set an end date - give people enough time to respond without letting the window drag. One to two weeks is a common sweet spot.
- 3Confirm the audience and anonymity - these are the settings that are hardest to change once a survey is live, so double-check them on the preview screen.
- 4Launch - publish the survey. Invitations go out on your chosen channels, and the survey moves to a running state.
Once a survey is live, key settings - especially audience and anonymity - are locked to protect the integrity of the responses already coming in. Confirm them before you hit launch rather than trying to fix them mid-flight.
Set up reminders
Not everyone responds to the first invitation, and that's normal. Reminders are the single biggest lever on participation. From the running survey you can configure automated reminders - one-time or recurring - that nudge only the people who haven't yet responded, on whichever channel you choose. You can also send a manual reminder at any point if you want to give participation a specific push before the survey closes.
A light touch works best: one or two well-timed reminders lift completion meaningfully; a barrage annoys people and erodes goodwill.
Monitor participation
While the survey runs, keep an eye on Analyse › Participation. This shows your response rate broken down by team, location and manager, so you can see exactly where participation is lagging and target your reminders - or a quiet word to a manager - accordingly. You can also export the list of people who haven't yet responded if you need to follow up directly.
A low response rate isn't just a data problem - it often is the finding. Teams that don't respond may be the ones least confident that their voice matters. Watch the participation breakdown as closely as you'll later watch the scores.
Week 4 - Analyse and act
Your survey has closed and the responses are in. This final week is where engagement work actually pays off - reading what people told you, sharing it, and doing something about it.
Read the dashboard and reports
Start with the Dashboard for the headline view - your overall engagement score, eNPS and participation rate at a glance. A full walkthrough of what each tile means is in Read the admin dashboard.
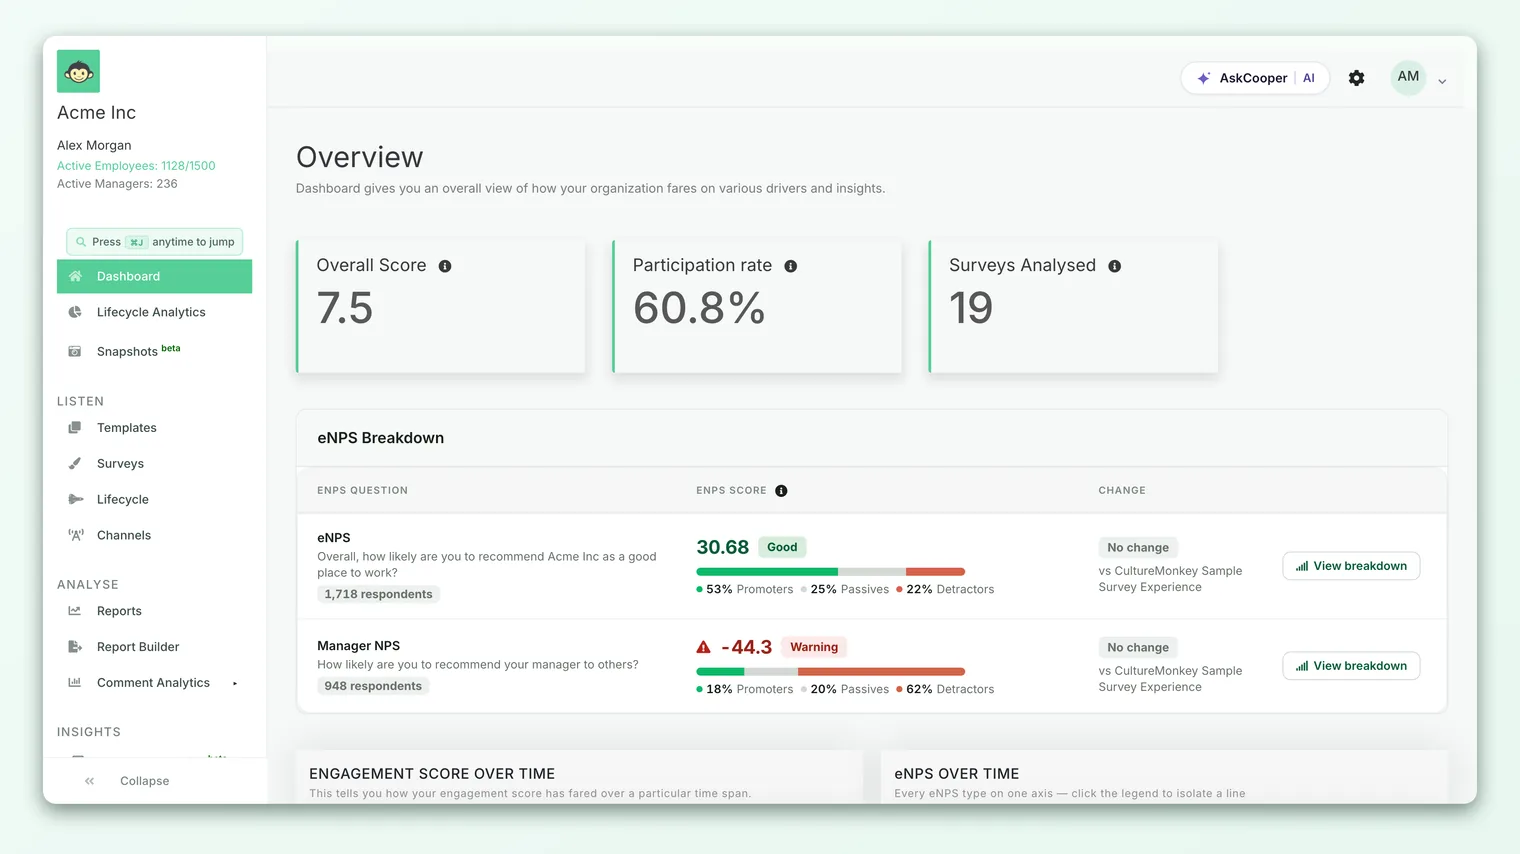
From there, go deeper in Analyse › Reports:
- 1Read the summary - the top-line scores and how they compare over time.
- 2Break down by driver - see which engagement drivers score highest and lowest. The low ones are where your attention belongs.
- 3Slice by segment - filter by team, location or manager to find where sentiment is strong and where it needs help. A healthy company average can easily hide a struggling team.
- 4Read the comments - open Analyse › Comment Analytics to read the open-text feedback and its AI-grouped topics. This is where the why behind the numbers lives.
Share the results
Results that stay in your account don't change anything. Share the headline story with leadership and, crucially, give managers their team-level views (which respect the anonymity threshold). You can also export a report as PDF or PowerPoint for a leadership briefing. The act of sharing signals that the survey was taken seriously - and sets up the accountability that makes the next step stick.
Create action plans
Insight only matters if it leads to change. In Act › Actions, turn your biggest findings into concrete action plans: give each one a clear owner, a deadline, and a link to the driver or feedback it addresses. Focus on a small number of high-impact actions rather than a long wish list - two changes that actually happen beat ten that don't.
Close the loop with employees
This is the step that separates programs that build trust from those that quietly erode it. Go back to your people and tell them what you heard and what you're going to do about it - "you said, we're doing." You don't need every answer; you need to show that their feedback was read and is being acted on. Employees who see their feedback lead to real change are far more likely to respond honestly next time - which makes every future survey more valuable.
The survey isn't the finish line; it's the start of a conversation. Close the loop visibly and you've done the most important thing an engagement program can do. Skip it, and participation will fall the next time you ask.
Your pre-launch checklist
Before you send your first survey, run through this quick check. If you can tick every box, you're ready:
- 1Account settings - company name, logo and timezone are correct.
- 2Employees - your list is imported, current, and free of blank teams or managers.
- 3Org structure - teams, locations and any custom attributes are set up.
- 4Roles - co-admins are invited and managers are added.
- 5Survey - questions are focused, anonymity is set, and you've previewed it as a participant.
- 6Distribution - channels are chosen, launch and end dates are set, and reminders are configured.
Common pitfalls to avoid
A few mistakes trip up almost every first-time admin. Knowing them in advance is half the battle:
- Launching before your data is clean. A survey built on a messy employee list produces messy, hard-to-trust reports. Do week one properly.
- Over-long surveys. More questions mean lower completion and noisier data. Keep your first survey tight.
- Wrong timezone. A misconfigured timezone can send invitations in the middle of the night. Check it early.
- Setting the anonymity threshold too low. It might reveal more segments, but it undermines the trust that produces honest answers.
- Skipping reminders. Most non-responses are simply forgotten invitations, not refusals. Reminders recover them.
- Never closing the loop. The fastest way to kill participation in your next survey is to do nothing visible with this one.
Frequently asked questions
Do I really need to spend a full month?
No - the four weeks are a sequence, not a schedule. A small organization can move through it in a couple of weeks. What matters is the order: foundation, then build, then launch, then act. Don't skip ahead to building a survey before your people data is clean.
Should my first survey be anonymous?
For a first engagement survey, yes. Anonymous surveys produce the most honest feedback, and honesty is exactly what you want when you're establishing a baseline. You can always run identified surveys in CultureMonkey later for specific purposes.
How many questions should a first survey have?
Keep it focused - a handful of rating questions across the drivers you care about, one eNPS question, and one open-text question is a strong, completable first survey. You can always go deeper next cycle.
What if participation is low?
First, send reminders - most non-responses are forgotten invitations. Then check Analyse › Participation in CultureMonkey to see which teams are lagging and follow up with those managers directly. Persistently low participation in a team is often itself a finding worth exploring.
When should I run the next survey?
Often enough to see a trend, but not so often that you cause survey fatigue. Many organizations run a fuller engagement survey each cycle with lighter pulse surveys in between. The most important thing is that you've closed the loop on this one first - that's what makes people respond to the next.
Where to go next
- Build your survey step by step: Create a survey from scratch
- Get your people in: Import employees from a CSV
- Make sense of the results: Read the admin dashboard
- Understand your headline advocacy score: What is eNPS and how is it calculated?
Your feedback helps us improve the Help Center.