

Use the candidate heatmap, filters and heatmap settings
Read the candidate heatmap by job, recruiter and hiring manager, drill into drivers, apply filters and set what each role can see.
On this page
The candidate heatmap in CultureMonkey is the ENGAGEMENT SCORE BY DRIVERS chart on the Report tab of every candidate survey report. It lays each driver score out against a candidate attribute, such as job, primary recruiter or hiring manager, so you can see at a glance which part of your hiring process is scoring low and for whom.
Related release: Candidate Experience: configurable heatmaps and a new Sub Admin role (July 29, 2026). See every dated change on Product Updates.
This guide covers how to read the heatmap, which demographic tabs it offers, why some columns are missing, how filters and driver drill-down work, and how a Super Admin uses Heatmap Settings to decide which demographics each role can see.
Open a candidate report, go to the Report tab and scroll to ENGAGEMENT SCORE BY DRIVERS. Pick a demographic tab, read across a row for a driver or down a column for a group, and click a score to drill into it. Groups with fewer responses than the survey's minimum (3 by default) are left out to protect anonymity. Super Admins control which demographics appear for each role under Settings > Heatmap, and CultureMonkey sets up the filters on request.
How to read the candidate heatmap
Each column is one value of the demographic you picked, starting with Overall. Each row is a measure:
- Participation Count and Participation Rate for that group.
- e-NPS, the candidate NPS for that group (see How candidate NPS is calculated).
- Overall Score, then one row for each driver in the survey.
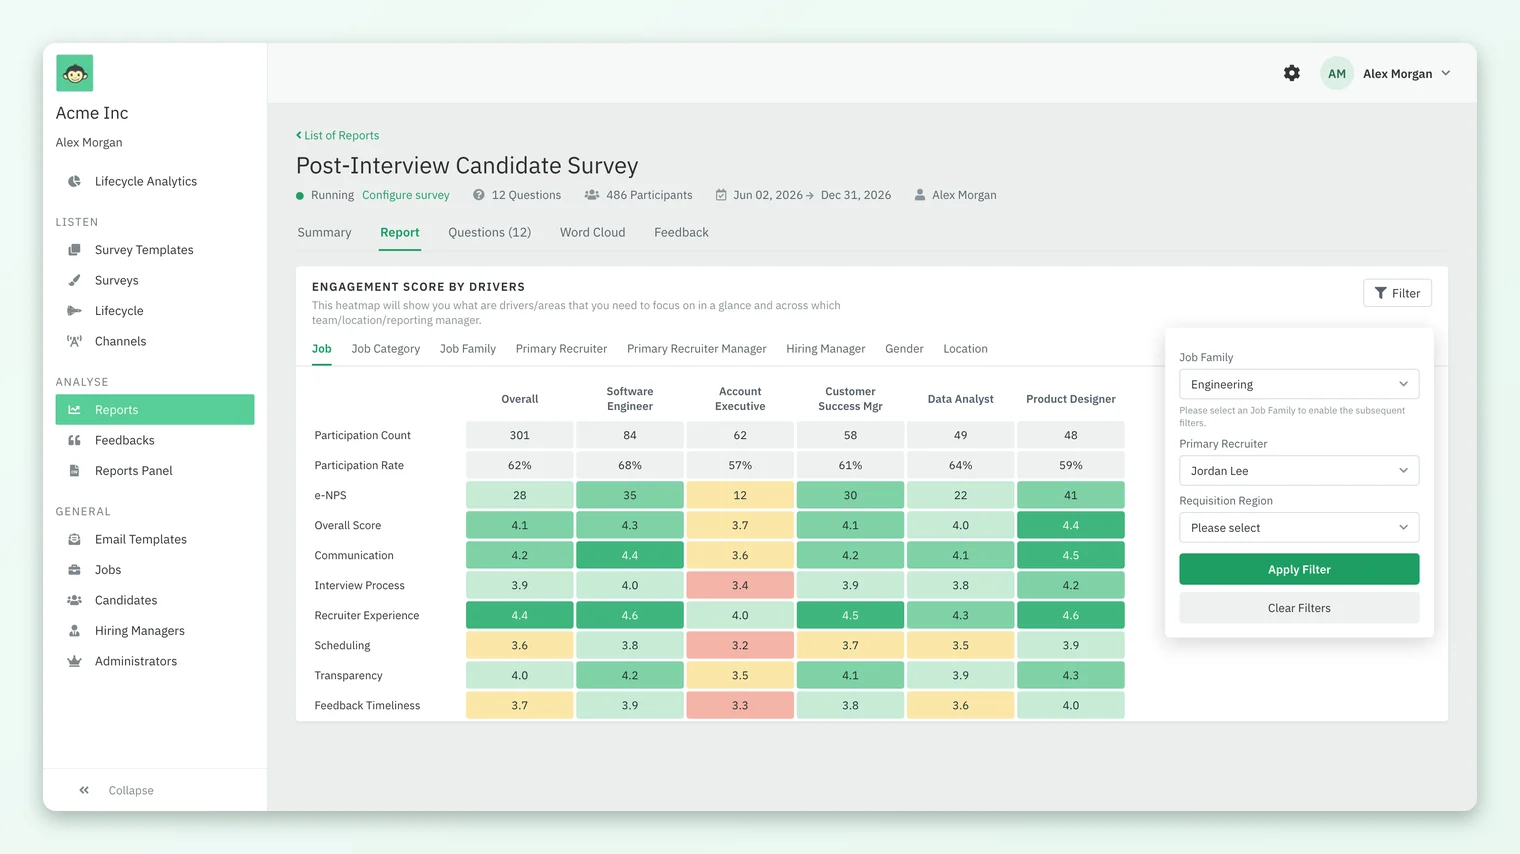
Darker green cells score higher and warmer cells score lower, so a column that runs warm from top to bottom is a group whose whole experience needs a look, while a row that runs warm across every column is a driver that is weak everywhere. Use Search... above the chart to find a column quickly, and the chart menu to export it as CSV or XLSX.
Which demographic tabs can the heatmap show?
The tabs across the top of the heatmap come from candidate attributes:
| Tab group | Tabs | When they appear |
|---|---|---|
| Standard | Gender, Job, Job Category, Employee Type, Job Profile, Job Family, Job Family Group, Primary Recruiter, Primary Recruiter Manager, Hiring Manager | Always available, subject to Heatmap Settings |
| Location | Location tabs | When CultureMonkey turns them on for your account |
| Job hierarchy | L2, L3 and L4 levels from the job's level hierarchy | When CultureMonkey turns them on for your account |
| Custom attributes | One tab per candidate custom attribute | Once at least 3 candidates have a value for it |
There is no standard race or ethnicity field for candidates. If you need that cut, it has to be added as a candidate custom attribute; see Add custom attributes to CultureMonkey candidate records.
Why are some groups missing from the heatmap?
A column is only shown when enough candidates in that group responded. The threshold is the survey's minimum response count, which is 3 by default for anonymous surveys. If the survey has no minimum of its own, your account's dashboard anonymity threshold is used instead. Three related rules follow from this:
- When you apply a filter and the filtered Overall group falls below the threshold, all scores are hidden rather than just some of them.
- Driver drill-down uses the same minimum, so a breakdown will not show a group smaller than it.
- A demographic hidden in Heatmap Settings cannot be requested at all, even by editing the page address.
More on how thresholds protect respondents is in Are candidate survey answers anonymous?.
How do I drill into a driver score?
Click a score cell to open the drill-down, which asks you to "Choose your demographics to get a detailed breakdown on the above driver score". Pick a second demographic and the driver is split again, for example a weak Interview Process score for one job split by hiring manager. Drill-down is not available on the Overall column, or while a rating-distribution filter is applied.
How do heatmap filters work?
When filters are configured for your account, a Filter button appears at the top right of the heatmap. Filters narrow every number on the heatmap to a slice of candidates, for example one job family and one recruiter.
- 1Click Filter to open the panel.
- 2Choose a value in the first filter. The others unlock after it, as the panel explains: "Please select an ... to enable the subsequent filters."
- 3Pick values in any further filters you need. Some allow more than one value.
- 4Click Apply Filter. Use Clear Filters to return to the full survey.
Filters can be built on the standard candidate attributes, candidate or requisition country, requisition region and location, and candidate custom attributes. Each filter has a display title, an order and a visibility setting for Super Admins and Sub Admins. Filters are set up for your account by CultureMonkey: ask your CultureMonkey Success Manager to add or change one. A demographic hidden in Heatmap Settings cannot be used as a filter.
Heatmap Settings: choose what each role sees
Super Admins decide which demographics appear on the heatmap, and in what order, separately for Super Admins and Sub Admins. Open the settings with the gear icon at the top right, then choose Heatmap in the settings menu. The page is titled Heatmap Settings and has one section, Demographics Configuration.
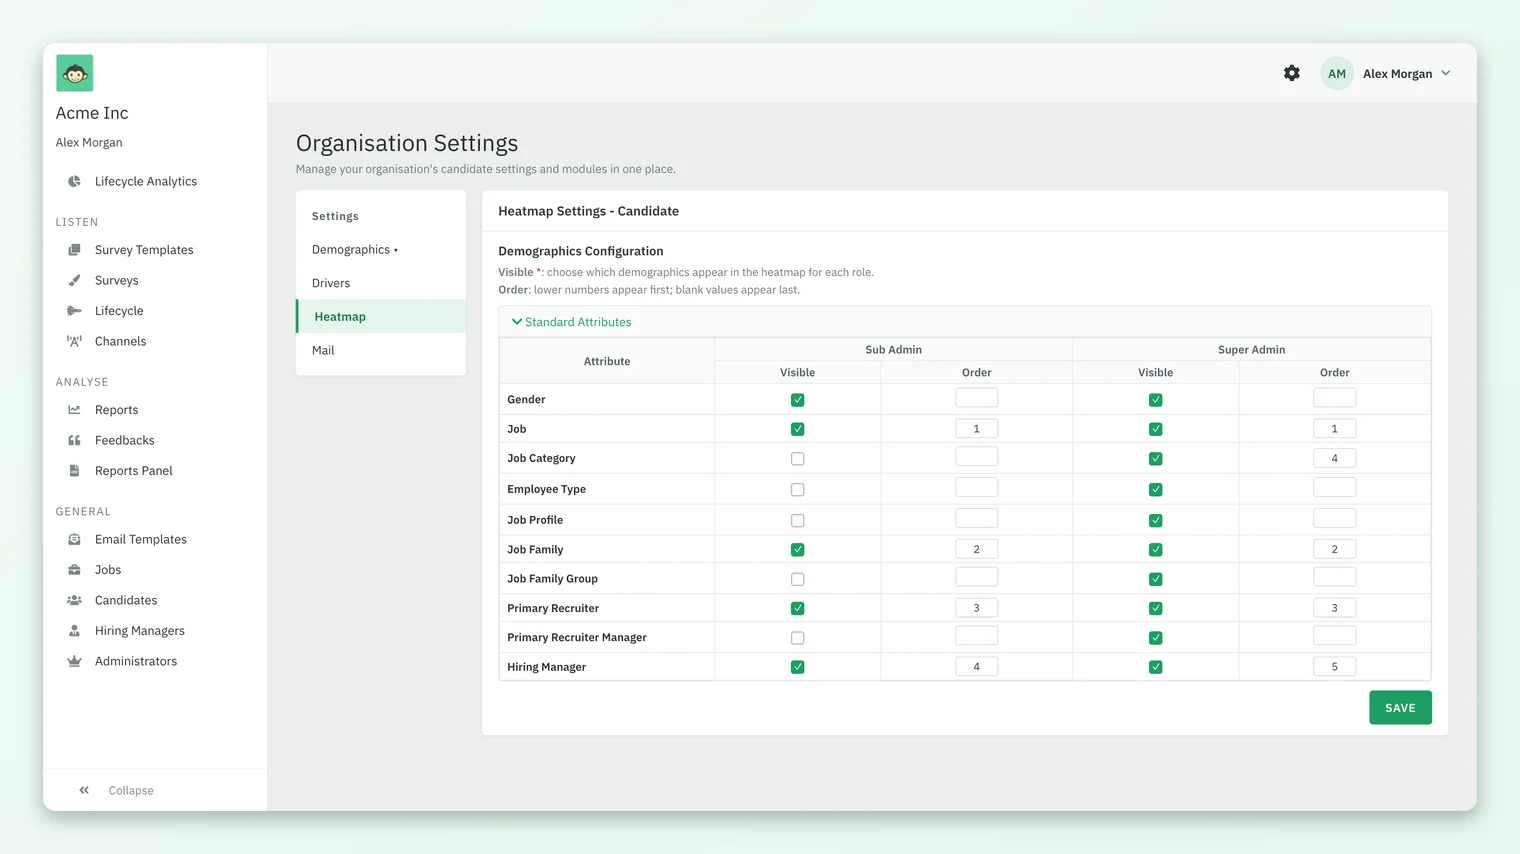
- 1Under Standard Attributes, tick Visible for each demographic you want a role to see, and untick the ones you want hidden.
- 2Type an Order number to control the tab order. Lower numbers appear first and blank values appear last.
- 3Repeat under Custom Attributes, which is shown when your account has candidate custom attributes.
- 4Click Save and confirm. You will see "Heatmap settings updated successfully."
Each role must keep at least one standard attribute visible. If you untick them all for a role, the save is refused with "At least one standard attribute must be enabled for each role."
These settings are enforced on the server, not just hidden in the page, so a Sub Admin cannot reach a demographic you have switched off for Sub Admins.
Frequently asked questions
Who can change Heatmap Settings?
Only Super Admins. Sub Admins cannot open the settings area at all; they simply see the demographics a Super Admin has made visible for the Sub Admin role.
Why is a custom attribute not showing as a heatmap tab?
A custom attribute only becomes a tab once at least 3 candidates have a value for it. Check too that it is ticked as visible for your role under Heatmap Settings.
Can I add my own heatmap filters?
Filters are configured for your account by CultureMonkey. Tell your CultureMonkey Success Manager which attributes you want to filter on, in what order, and which roles should see each one.
Why did every score disappear after I applied a filter?
The filtered group was smaller than the survey's minimum response count, so all scores were suppressed to protect the candidates in it. Widen the filter or click Clear Filters.
Can I break the candidate heatmap down by race or ethnicity?
Only if you store it as a candidate custom attribute, because it is not a standard candidate field. Once at least 3 candidates have a value, it appears as a tab like any other custom attribute.
Can I export the candidate heatmap?
Yes. Use the chart menu on the heatmap to download it as CSV or XLSX.
Where to go next
Your feedback helps us improve the Help Center.